
Medication Administration and Intravenous Therapies
Lessons
- Objectives
- Introduction
- Legal Aspects Of Drug Administration
- Medication Orders
- Practice Exercise 1
- Routes Of Administration
- Oral Medications
- Sublingual And Buccal Medications
- Parenteral Medications
- Practice Exercise 2
- Topical Medications
- Administering Medications By Inhalation
- Preventing And Responding To Medication Errors
- Practice Exercise 3
- Summary
- Comprehensive Questions
Notes Highlighting is available once you sign in. Login Here.
Objectives
- Define selected terms related to the administration of medications.
- Describe legal aspects of administering medications.
- Describe various routes of medication administration.
- Identify essential parts of a medication order.
- List examples of various types of medication orders
Introduction
Pharmacology is the study of the effect of drugs on living organisms.
Pharmacy is the art of preparing, compounding, and dispensing drugs.
A medication is a substance administered for the diagnosis, cure, treatment, or relief of a symptom or for prevention of disease.
In the health care context, the words medication and drug are generally used interchangeably.
The term drug also has the connotation of an illicitly obtained substance such as heroin, cocaine, or amphetamines.
The written direction for the preparation and administration of a drug is called a prescription.
One drug can have as many as four kinds of names: its generic name, trade name (or brand name), official name, and chemical name.
- The generic name is assigned by the United States Adopted Names (USAN) Council and is used throughout the drug’s lifetime.
- A drug’s trade name (sometimes called the brand name) is the name given by the drug manufacturer and identifies it as property of that company.
- The official name is the name under which a drug is listed in one of the official publications (e.g., the United States Pharmacopeia).
- The chemical name is the name by which a chemist knows it; this name describes the constituents of the drug precisely.
Legal Aspects Of Drug Administration
Within the United States, laws have been enacted to control the development and administration of drugs.
To function beyond the limits of nursing practice acts or one’s ability is to endanger clients’ lives and leave oneself open to professional negligence lawsuits.
Under the law, nurses are responsible for their own actions regardless of whether there is a written order. Therefore, nurses should question any order that appears unreasonable and refuse to give the medication until the order is clarified.
Another aspect of nursing practice governed by law is the use of controlled substances. Most health care agencies maintain a list of high-alert medications, including controlled substances, which require the verification of two registered nurses.
When a portion or all of a controlled substance dose is discarded, the nurse must ask a second nurse to witness the discarding. Both nurses must sign the control inventory form.
In most agencies, counts of controlled substances are taken at the end of each shift. The count total should tally with the total at the end of the last shift minus the number used. If the totals do not tally and the discrepancy cannot be resolved, it must be reported immediately to the nurse manager, nursing supervisor, and pharmacy according to agency policy.

Medication Orders
A physician usually determines the client’s medication needs and orders medications, although in some settings nurse practitioners and physician assistants now order some drugs.
4.1 Types of Medication Orders
Four types of medication orders are commonly used:
1. A stat order indicates that the medication is to be given immediately and only once (e.g., morphine sulfate 10 milligrams IV stat).
2. The single order or one-time order is for medication to be given once at a specified time (e.g., Seconal 100 milligrams at bedtime before surgery).
3. The standing order may or may not have a termination date. A standing order may be carried out indefinitely.
4. A prn order, or as-needed order, permits the nurse to give a medication when, in the nurse’s judgment, the client requires it.
4.2 Essential Parts of a Medication Order
-
Full name of the client
- Date and time the order is written
- Name of the drug to be administered
- Dosage of the drug
- Frequency of administration
- Route of administration
- Signature of the person writing the order
Parts of a Prescription
- Descriptive information about the client: name, address, and sometimes age
- Date on which the prescription was written
- The Rx symbol, meaning “take thou”
- Medication name, dosage, and strength
- Route of administration
- Dispensing instructions for the pharmacist, for example, “Dispense 30 capsules”
- Directions for administration to be given to the client, for example, “take on an empty stomach”
- Refill and/or special labeling, for example, “Refill × 1”
- Prescriber’s signature
4.3 Calculation of the correct dosage
-
When calculating dosages of oral medications, check the calculation and question the prescription if the calculation calls for more than 3 tablets.
- When calculating dosages of parenteral medications, check the calculation and question the prescription if the amount to be given is too large a dose.
- Be sure that all measures are in the same system and that all units are in the same size, converting when necessary; carefully consider what the reasonable amount of the medication that would be administered is.
- Round standard injection doses to tenths and measure in a 3-mL syringe (follow agency policy).
- Per agency policy, it may be acceptable to round down (avoid rounding up) small, critical amounts or children’s doses to hundredths and measure in a 1-mL tuberculin syringe (example: 1.752 mL can be rounded to 1.75 mL).
Nursing insights
Standard formula: DA ×Q=X
D (desired) is the dosage that the primary health care provider prescribed.
A (available) is the dosage strength as stated on the medication label.
Q (quantity) is the volume or form in which the dosage strength is available, such as tablets, capsules, or milliliters.
Intravenous flow rates:
- Monitor IV flow rate frequently even if the IV solution is being administered through an electronic infusion device.
- Whenever a prescribed IV rate is increased, the nurse needs to assess the client for increased respirations and increased lung congestion, which could indicate fluid overload.
- Intravenously administered fluids are prescribed most frequently based on milliliters per hour.
- The volume per hour prescribed is administered by setting the flow rate, which is counted in drops per minute.
Reconstitution of medications:
- In reconstituting a medication, locate the instructions on the label or in the vial package insert, and read and follow the directions carefully.
- Instructions will state the volume of diluent to be used and the resulting volume of the reconstituted medication.
- Often, the powdered medication adds volume to the solution in addition to the amount of diluent added.
- The total volume of the prepared solution will exceed the volume of the diluent added.
- When reconstituting a multiple-dose vial, label the medication vial with the date and time of preparation, your initials, and the date of expiration.
- Indicating the strength per volume on the medication label also is important.
Routes Of Administration
Pharmaceutical preparations are generally designed for one or two specific routes of administration.
Include:
- Oral
- Sublingual
- Buccal
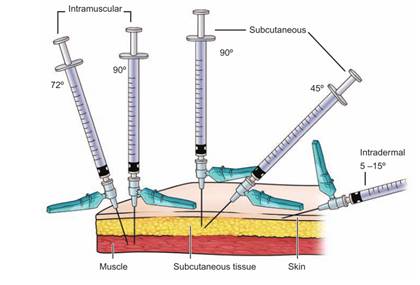
- Parenteral:
- Subcutaneous (hypodermic)—into the subcutaneous tissue, just below the skin
- Intramuscular (IM)—into a muscle
- Intradermal (ID)—under the epidermis (into the dermis)
- Intravenous (IV)—into a vein.
- Topical
Oral Medications
The oral route is the most common route by which medications are given. As long as a client can swallow and retain the drug in the stomach, this is the route of choice.
Oral medications are contraindicated when a client is vomiting, has gastric or intestinal suction, or is unconscious and unable to swallow.
SKILL: Administering oral medications
- Complete necessary assessments before administering medications. Check the patient’s allergy bracelet or ask the patient about allergies. Explain the purpose and action of each medication to the patient.
- Assist the patient to an upright or lateral position.
- Administer medications:
- Offer water or other permitted fluids with pills, capsules, tablets, and some liquid medications.
- Ask whether the patient prefers to take the medications by hand or in a cup.
- Remain with the patient until each medication is swallowed. Never leave medication at the patient’s bedside.
- Assist the patient to a comfortable position. Remove PPE, if used. Perform hand hygiene.
- Document the administration of the medication immediately after administration.
- Evaluate patient’s response to medication within appropriate time frame
SKILL: Administering Medications by Nasogastric or Gastrostomy Tube
Always check with the pharmacist to see if the client’s medications come in a liquid form because these are less likely to cause tube obstruction.
If medications do not come in liquid form, check to see if they may be crushed.
Sterile water is recommended for use in adult and neonatal/pediatric clients before and after medication administration.
Assess tube placement prior to administration of medications.
Before giving the medication, aspirate all the stomach contents and measure the residual volume. Check agency policy if residual volume is greater than 100 mL.
When administering the medication(s):
- Remove the plunger from the syringe and connect the syringe to a pinched or kinked tube. Pinching or kinking the tube prevents excess air from entering the stomach and causing distention.
- Put 15 to 30 mL (5 to 10 mL for children) of sterile water into the syringe barrel to flush the tube before administering the first medication.
- Raise or lower the barrel of the syringe to adjust the flow as needed.
- Pinch or clamp the tubing before all the water is instilled to avoid excess air entering the stomach.
- Pour liquid or dissolved medication into the syringe barrel and allow to flow by gravity into the enteral tube.
- If you are giving several medications, administer each one separately and flush with at least 15 to 30 mL (5 mL for children) of tap water between each medication.
- When you have finished administering all medications, flush with another 15 to 30 mL (5 to 10 mL for children) of warm water to clear the tube.
Sublingual And Buccal Medications
Certain drugs, such as nitroglycerin, are administered sublingually; that is, a tablet is placed under the patient’s tongue.
Another method is to administer the medication between the cheek and gum, known as buccal administration.
These areas are rich in superficial blood vessels, which allow the drug to be absorbed relatively rapidly into the bloodstream for quick systemic effects.
Sublingual and buccal medications should not be swallowed, but rather held in place so that complete absorption can occur.
Before administering a sublingual or buccal drug, offer the patient a drink of water (if the patient is permitted to have fluids) or oral care (if the patient is NPO). This ensures that the tablet will dissolve appropriately.
Parenteral Medications
Nurses give parenteral medications intradermally (ID), subcutaneously, intramuscularly (IM), or intravenously (IV).
Because these medications are absorbed more quickly than oral medications and are irretrievable once injected, the nurse must prepare and administer them carefully and accurately.
EQUIPMENT
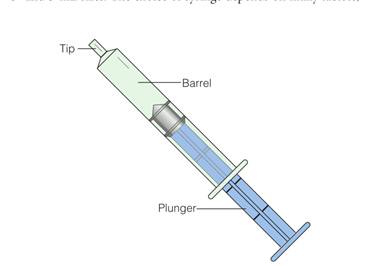
Syringes:
Syringes have three parts:
- the tip, which connects with the needle
- the barrel, or outside part, on which the scales are printed
- plunger, which fits inside the barrel
The choice of syringe depends on many factors, such as medication, location of injection, and type of tissue.
Syringes range in sizes from 1 to 60 mL.
Syringes ranging from 1 to 3 mL may have two scales marked on them: the minim and the milliliter. The milliliter scale is the one normally used; the minim scale is used for very small dosages.
The larger sized syringes (e.g., 10, 20, and 50 mL) are not used to administer drugs directly but can be useful for adding medications to IV solutions or for irrigating wounds.
- A hypodermic syringe comes in 3- and 5-mL sizes.
- An insulin syringe is similar to a hypodermic syringe, but the scale is specially designed for insulin: a 100-unit calibrated scale intended for use with U-100 insulin
- The tuberculin syringe was originally designed to administer tuberculin solution. It is a narrow syringe, calibrated in tenths and hundredths of a milliliter (up to 1 mL) on one scale and in sixteenths of a minim (up to 1 minim) on the other scale.
The tip of a syringe varies and is classified as either a LuerLok or non–Luer-Lok.
- A Luer-Lok syringe has a tip that requires the needle to be twisted onto it to avoid accidental removal of the needle
- The non–Luer-Lok syringe has a smooth graduated tip, and needles are slipped onto it.
Needles:
Needles are made of stainless steel, and most are disposable.
Reusable needles (e.g., for special procedures) need to be sharpened periodically before resterilization because the points become dull with use and are occasionally damaged or acquire burrs on the tips.
A needle has three discernible parts: the hub, which fits onto the syringe; the cannula, or shaft, which is attached to the hub; and the bevel, which is the slanted part at the tip of the needle.
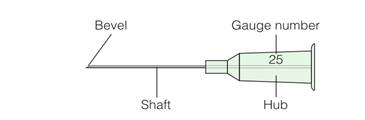
Needles used for injections have three variable characteristics:
- Slant/ length of the bevel:
- Longer bevels provide the sharpest needles and cause less discomfort. They are commonly used for subcutaneous and intramuscular injections.
- Short bevels are used for intradermal and IV injections because a long bevel can become occluded if it rests against the side of a blood vessel.
- Length of the shaft: The shaft length of commonly used needles varies from 1/2 to 2 inches.
- Gauge/ diameter of the shaft: The gauge varies from #18 to #30. The larger the gauge number, the smaller the diameter.
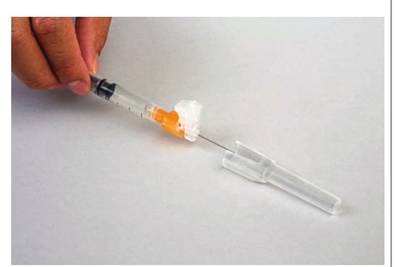
PREVENTING NEEDLESTICK INJURIES
Needlestick injuries present a major risk for infection with hepatitis B virus, human immunodeficiency virus (HIV), and many other pathogens.
Use appropriate puncture-proof disposal containers to dispose of uncapped needles and sharps.
Never bend or break needles before disposal.
Never recap used needles.
When recapping a needle (i.e., drawing up a medication into a syringe prior to administration):
- Use a safety mechanical device that firmly grips the needle cap and holds it in place until it is ready to recap
- Use a one-handed “scoop” method. This is performed by (a) placing the needle cap and syringe with needle horizontally on a flat surface, (b) inserting the needle into the cap, using one hand and then (c) using your other hand to pick up the cap and tighten it to the needle hub.
6.3.1 INTRADERMAL INJECTION
SKILL: Administering an Intradermal Injection
Equipment: Sterile syringe, usually a tuberculin syringe calibrated in tenths and hundredths, and needle, 1⁄4” to 1⁄2”, 26 or 27-gauge, antimicrobial swab, disposable gloves, small gauze square
- Select an appropriate administration site. Assist the patient to the appropriate position for the site chosen. Drape as needed to expose only area of site to be used.
- Cleanse the site with an antimicrobial swab while wiping with a firm, circular motion and moving outward from the injection site. Allow the skin to dry.
- Remove the needle cap with the nondominant hand by pulling it straight off.
- Use the nondominant hand to spread the skin taut over the injection site.
- Hold the syringe in the dominant hand, between the thumb and forefinger with the bevel of the needle up.
- Using the dominant hand allows for easy, appropriate handling of syringe. Having the bevel up allows for smooth piercing of the skin and introduction of medication into the dermis.
- Hold the syringe at a 5- to 15- degree angle from the site. Place the needle almost flat against the patient’s skin, bevel side up, and insert the needle into the skin. Insert the needle only about 1/8” under the skin,
- Once the needle is in place, steady the lower end of the syringe. Slide your dominant hand to the end of the plunger.
- Slowly inject the agent while watching for a small wheal or blister to appear.
- Withdraw the needle quickly at the same angle that it was inserted. Do not recap the used needle. Engage the safety shield or needle guard.
- Do not massage the area after removing needle. Tell patient not to rub or scratch the site. If necessary, gently blot the site with a dry gauze square. Do not apply pressure or rub the site.
6.3.2 SUBCUTANEOUS INJECTION
Subcutaneous injections are administered into the adipose tissue layer just below the epidermis and dermis.
This tissue has few blood vessels, so drugs administered here have a slow, sustained rate of absorption into the capillaries. This route is used to administer drugs such as insulin and heparin.
Various sites may be used for subcutaneous injections, including the outer aspect of the upper arm, the abdomen (from below the costal margin to the iliac crests), the anterior aspects of the thigh, the upper back, and the upper ventral or dorsogluteal area.
Equipment: A 25- to 30-gauge, 3/8” to 1”needle can be used. The 3/8” and 5/8” needles are most commonly used. Usually, no more than 1 mL of solution is given subcutaneously.
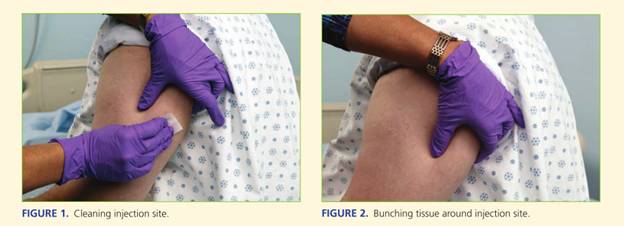
SKILL: Administering a Subcutaneous Injection
Equipment: Sterile syringe and needle. Needle size depends on the medication administered and patient body type. Antimicrobial swab, Disposable gloves, Small gauze square
- Cleanse the area around the injection site with an antimicrobial swab. Use a firm, circular motion while moving outward from the injection site. Allow area to dry.
- Remove the needle cap with the nondominant hand, pulling it straight off.
- Grasp and bunch the area surrounding the injection site or spread the skin taut at the site.
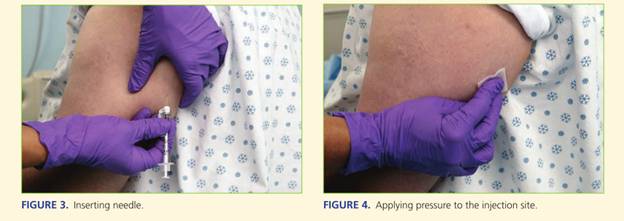
- Hold the syringe in the dominant hand between the thumb and forefinger. Inject the needle quickly at a 45- to 90degree angle.
- After the needle is in place, release the tissue. If you have a large skin fold pinched up, ensure that the needle stays in place as the skin is released. Immediately move your nondominant hand to steady the lower end of the syringe. Slide your dominant hand to the end of the plunger. Avoid moving the syringe.
- Inject the medication slowly (at a rate of 10 seconds per milliliter).
- Withdraw the needle quickly at the same angle at which it was inserted, while supporting the surrounding tissue with your nondominant hand.
- Using a gauze square, apply gentle pressure to the site after the needle is withdrawn. Do not massage the site.
- Do not recap the used needle. Engage the safety shield or needle guard. Discard the needle and syringe in the appropriate receptacle.
- Document the administration of the medication immediately after administration.
- Evaluate the response of the patient to the medication within an appropriate time frame for the particular medication.
6.3.3 INTRAMUSCULAR INJECTION
Intramuscular injections deliver medication through the skin and subcutaneous tissues into certain muscles.
Muscles have larger and a greater number of blood vessels than does subcutaneous tissue, allowing faster onset of action than with subcutaneous injections.
Consider the age of the patient, medication type, and medication volume when selecting a site for intramuscular injection.
SKILL: Administering an Intramuscular Injection
- Identify the appropriate landmarks for the site chosen.
- Cleanse the area around the injection site with an antimicrobial swab. Use a firm, circular motion while moving outward from the injection site. Allow area to dry.
- Remove the needle cap by pulling it straight off. Hold the syringe in your dominant hand between the thumb and forefinger.
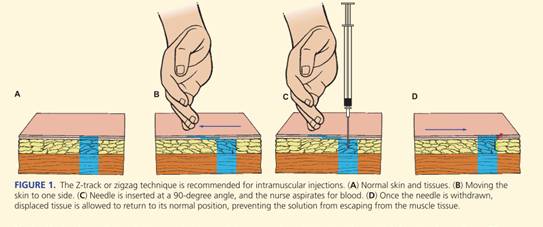
- Displace the skin in a Z-track manner by pulling the skin down or to one side about 1” (2.5 cm) with your nondominant hand and hold the skin and tissue in this position.
- Quickly dart the needle into the tissue so that the needle is perpendicular to the patient’s body. This should ensure that it is given using an angle of injection between 72 and 90 degrees.
- As soon as the needle is in place, use the thumb and forefinger of your nondominant hand to hold the lower end of the syringe. Slide your dominant hand to the end of the plunger. Inject the solution slowly (10 seconds per milliliter of medication).
- Once the medication has been instilled, wait 10 seconds before withdrawing the needle.
- Withdraw the needle smoothly and steadily at the same angle at which it was inserted, supporting tissue around the injection site with your nondominant hand.
- Apply gentle pressure at the site with a dry gauze. Do not massage the site.
6.3.4 INTRAVENOUS ADMINISTRATION
SKILL: Administering Medications by Intravenous Bolus or Push Through an Intravenous Infusion
- Complete necessary assessments before administering medications. Check the patient’s allergy bracelet or ask the patient about allergies. Explain the purpose and action of the medication to the patient.
- Scan the patient’s bar code on the identification band, if required.
- Assess IV site for presence of inflammation or infiltration.
- If IV infusion is being administered via an infusion pump, pause the pump.
- Put on clean gloves.
- Select injection port on tubing that is closest to venipuncture site. Clean port with antimicrobial swab.
- Uncap syringe. Steady port with your nondominant hand while inserting syringe into center of port.
- Move your nondominant hand to the section of IV tubing just above the injection port. Fold the tubing between your fingers.
- Pull back slightly on plunger just until blood appears in tubing.
- Inject the medication at the recommended rate
- Release the tubing. Remove the syringe. Do not recap the used needle, if used. Discard the needle and syringe in the appropriate receptacle.
- Check IV fluid infusion rate. Restart infusion pump, if appropriate.
- Evaluate patient’s response to medication within appropriate time frame.
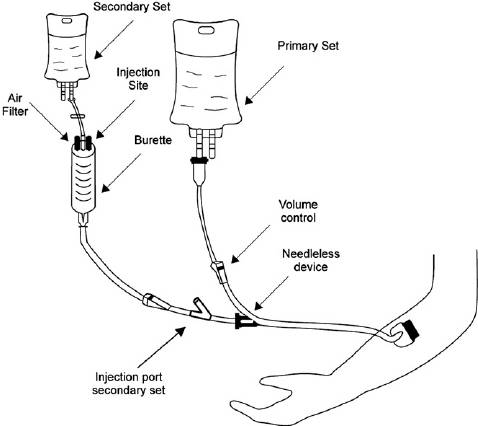
SKILL: Administering a Piggyback Intermittent Intravenous Infusion of Medication
- Complete necessary assessments before administering medications. Check the patient’s allergy bracelet or ask the patient about allergies. Explain the purpose and action of the medication to the patient.
- Scan the patient’s bar code on the identification band, if required.
- Assess the IV site for the presence of inflammation or infiltration.
- Close the clamp on the short secondary infusion tubing. Using aseptic technique, remove the cap on the tubing spike and the cap on the port of the medication container, taking care to avoid contaminating either end.
- Attach infusion tubing to the medication container by inserting the tubing spike into the port with a firm push and twisting motion, taking care to avoid contaminating either end.
- Hang piggyback container on IV pole, positioning it higher than primary IV according to manufacturer’s recommendations. Use metal or plastic hook to lower primary IV fluid container.
- Place label on tubing with appropriate date.
- Squeeze drip chamber on tubing and release. Fill to the line or about half full. Open clamp and prime tubing. Close clamp. Place needleless connector on the end of the tubing, using sterile technique, if required.
- Use an antimicrobial swab to clean the access port or stopcock above the roller clamp on the primary IV infusion tubing.
- Connect piggyback setup to the access port or stopcock. If using, turn the stopcock to the open position.
- Open clamp on the secondary tubing. Set rate for secondary infusion on infusion pump and begin infusion. If using gravity infusion, use the roller clamp on the primary infusion tubing to regulate flow at prescribed delivery rate. Monitor medication infusion at periodic intervals.
- Clamp tubing on piggyback set when solution is infused. Follow facility policy regarding disposal of equipment.
- Replace primary IV fluid container to original height. Check primary infusion rate on infusion pump. If using gravity infusion, readjust flow rate of primary IV.
- Remove PPE, if used. Perform hand hygiene.
- Document.
- Evaluate the patient’s response.
Topical Medications
Medications delivered via the topical route are applied to the skin or mucous membranes, including the eyes, ears, nose, rectum, vagina, and lungs.
Topical applications are usually intended for direct action at a particular site, although some can have systemic effects and are given for systemic effect.
6.5.1 SKIN APPLICATIONS
When a drug is incorporated in an agent such as an ointment and rubbed into the skin for absorption, the procedure is referred to as an inunction.
On normal skin, drugs are absorbed into the lining of the sebaceous glands.
The following are typical preparations applied to skin areas:
- Powders are used to promote drying of the skin and prevent friction on the skin.
- Ointments provide prolonged contact of a medication with the skin and soften the skin.
- Creams and oils lubricate and soften the skin and prevent drying of the skin.
- Lotions protect and soothe the skin
- Transdermal delivery systems utilize reservoirs, micro reservoirs, adhesives, or matrices. The drug layer of the system contains drug, with a rate-controlling layer to slow the release of the drug over time, ending with an adhesive layer to enhance the attachment of the system to the patient’s skin. Are commonly used to deliver hormones, narcotic analgesics, cardiac medications, and nicotine.
SKILL: APPLYING TRANSDERMAL PATCHES
- Perform hand hygiene.
- Identify the patient.
- Explain procedure to patient.
- Put on gloves.
- Assess patient’s skin where patch is to be placed, looking for any signs of irritation or breakdown. Site should be clean, dry, and free of hair. Rotate application sites.
- Remove the old patch before applying the new one. Fold patch in half with adhesive sides sticking together and discard according to facility policy.
- Gently wash the area where the old patch was with soap and water.
- Remove the patch from its protective covering. Write your initials and the date and time of administration on the label side of the patch.
- Remove the covering without touching the medication surface. Apply the patch to the patient’s skin. Use the palm of your hand to press firmly for about 10 seconds. Do not massage.
- Remove gloves and perform hand hygiene.
- Apply the patch at the same time of the day, according to the order and medication specifications.
- Document site of application on the MAR.
- Evaluate patient’s response to medication within appropriate time frame.
- Check for dislodgement of the patch if the patient is active. Read information about the patch or consult with the prescriber or pharmacist to determine reapplication schedule and procedure.
- Assess for any skin irritation at application site. If necessary, remove the patch, wash the area carefully with soap and water, and allow skin to air dry. Apply a new patch at a different site. Assess the potential for adverse reaction.
- Aluminum backing on a patch necessitates precautions if defibrillation is required. Burns and smoke may result.
6.5.2 EYE INSTILLATIONS AND IRRIGATIONS
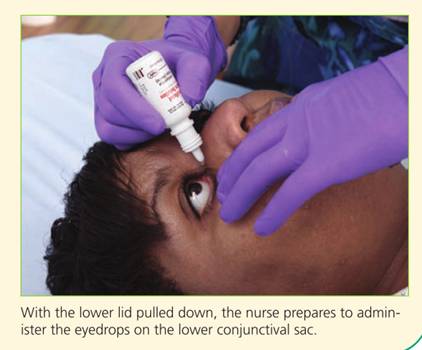
Because direct application cannot be made onto the sensitive cornea, applications intended to act on the eye or the lids are placed onto, or instilled or irrigated into, the lower conjunctival sac.
- EYEDROPS
Eyedrops are instilled for their local effects, such as for pupil dilation or constriction when examining the eye, for treating an infection, or for controlling intraocular pressure in patients with glaucoma
SKILL: INSTILLING EYE DROPS
- Perform hand hygiene.
- Identify the patient.
- Explain procedure to patient.
- Put on gloves.
- Offer the patient paper tissues to remove solution and tears that may spill from the eye during the procedure.
- Clean the eyelids and eyelashes of any drainage with cotton balls or gauze squares moistened with normal saline solution. Debris can be carried into the eye when the conjunctival sac is exposed. Use each area of the cleaning surface once, moving from the inner toward the outer canthus to prevent carrying debris to the lacrimal ducts.
- Tilt the patient’s head back slightly if sitting, or place the patient’s head over a pillow if lying down. The head may be turned slightly to the affected side to prevent solution or tears from flowing toward the opposite eye.
- Remove the cap from the medication bottle, being careful not to touch the inner side of the cap.
- Invert the monodrip plastic container that is commonly used to instill eyedrops.
- Have the patient look up while focusing on something on the ceiling.
- Place the thumb or two fingers near the margin of the lower eyelid immediately below the eyelashes, and exert pressure downward over the bony prominence of the cheek. The lower conjunctival sac is exposed as the lower lid is pulled down.
- Hold the dropper close to the eye but avoid touching the eyelids or lashes. Touching the eye, eyelids, or lashes can contaminate the medication in the bottle; startle the patient, causing blinking; or injure the eye.
- Squeeze the container and allow the prescribed number of drops to fall in the lower conjunctival sac. Do not allow medication to fall onto cornea. This may injure the cornea or cause the patient to have an unpleasant sensation.
- Release the lower lid after the eyedrops are instilled. Ask the patient to close the eyes gently.
- Apply gentle pressure with your gloved finger over the inner canthus to prevent the eyedrops from flowing into the tear duct. This minimizes the risk of systemic effects from the medication.
- Instruct the patient not to rub the affected eye.
- Remove gloves and perform hand hygiene.
- Chart the administration of medication on the MAR after the drops have been administered.
- Evaluate the patient’s response to the medication within the appropriate time frame.
- EYE IRRIGATION
Eye irrigation is performed to remove secretions or foreign bodies or to cleanse and soothe the eye. In an emergency, eye irrigation can be used to remove chemicals that may burn the eye.
The irrigation should continue for at least 15 minutes, and then professional help should be sought.
SKILL: PERFORMING AN IRRIGATION OF THE EYE
- Warm the solution to be instilled to body temperature to minimize discomfort for the patient.
- Perform hand hygiene.
- Identify the patient.
- Explain the procedure to the patient.
- Position the patient, sitting or lying, with head tilted toward side of affected eye. Protect patient and bed with a waterproof pad.
- Put on gloves.
- Clean the patient’s eye with a moistened washcloth, wiping from the inner canthus to outer canthus. Use a different part of the washcloth for each stroke.
- Place curved basin at cheek on side of affected eye to receive irrigating solution.
- Fill irrigation syringe with prescribed solution.
- Gently pull down on lower eyelid to expose conjunctival sac. Hold upper lid open.
- Hold syringe about 1 inch from eye. Direct flow of solution from inner to outer canthus along conjunctival sac. Avoid touching any part of the eye with the syringe.
- Pause irrigation periodically. Have patient close eye for a moment. Irrigate until solution is clear or all solution has been used.
- Dry periorbital area after irrigation.
- Remove gloves and perform hand hygiene.
- Evaluate the patient’s response to the procedure.
- Document the administration of irrigation on the MAR. Document the procedure, assessments, and patient response.
6.5.3 EAR INSTILLATIONS AND IRRIGATIONS
Drugs or irrigations are instilled into the auditory canal for their local effect.
They are used to soften wax, relieve pain, apply local anesthesia, destroy organisms, or destroy an insect lodged in the canal, which can cause almost intolerable discomfort.
- EAR DROPS
SKILL: INSTILLING EAR DROPS
- Warm the solution to be instilled to body temperature to minimize discomfort for the patient.
- Perform hand hygiene.
- Identify the patient.
- Explain the procedure to the patient.
- Put on gloves.
- Offer a tissue to the patient.
- Clean the external ear of drainage with cotton balls moistened with normal saline solution, as necessary.
- Place the patient on the unaffected side in bed, or if ambulatory, have the patient sit with the head well tilted to the side so that the affected ear is uppermost. This positioning prevents the drops from escaping from the ear.
- Draw up the amount of solution needed in the dropper. Excess medication should not be returned to a stock bottle. A monodrip plastic container may also be used.
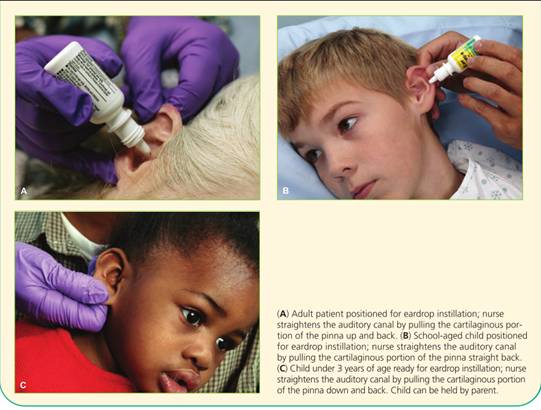
- Straighten the auditory canal by pulling the cartilaginous portion of the pinna up and back in an adult , straight back for a school-aged child, and down and back in an infant or a child under age 3 years. Pulling on the pinna as described helps to straighten the canal properly for ear instillation.
- Hold the dropper in the ear with its tip above the auditory canal. For an infant or an irrational or restless patient, protect the dropper with a piece of soft tubing to help prevent injury to the ear.
- Allow the drops to fall on the side of the canal. It is uncomfortable for the patient if drops fall directly onto the tympanic membrane.
- Release the pinna after instilling the drops, and have the patient maintain the position to prevent the medication from escaping.
- Gently press on the tragus a few times to help move the medication from the canal toward the tympanic membrane.
- If ordered, loosely insert a cotton ball to prevent medication from leaking out.
- Wait 5 minutes before instilling drops in the second ear, if ordered.
- Remove gloves and perform hand hygiene.
- Document the medication administration on the MAR. Document the procedure, assessments, and patient response.
- IRRIGATION OF THE EAR
Irrigations of the external auditory canal are ordinarily done for cleaning purposes or for applying heat to the area.
To prevent pain, the irrigation solution should be at least at room temperature.
SKILL: IRRIGATING THE EAR
- Warm the solution to be instilled to body temperature to minimize discomfort for the patient.
- Perform hand hygiene.
- Identify the patient.
- Explain the procedure to the patient.
- Put on gloves.
- Position patient, sitting or lying, with head tilted toward side of affected ear. Protect patient and bed with waterproof pad. Position basin under ear to receive irrigating solution.
- Clean pinna and meatus of auditory canal as necessary with cotton-tipped applicators moistened with tap water.
- Fill syringe with warm solution. If irrigating container is used, prime the tubing.
- Straighten auditory canal by pulling cartilaginous portion of pinna up and back for an adult.
- Direct a steady, slow stream of solution against the roof of the auditory canal, using only enough force to remove secretions. Do not occlude the auditory canal with the irrigating nozzle. Allow solution to flow out unimpeded.
- When irrigation is complete, place cotton ball loosely in auditory meatus. Position patient on the same side as the affected ear, with towel or absorbent pad under ear.
- Remove gloves and perform hand hygiene.
- Document the medication administration on the MAR. Document the procedure, assessments, and patient response.
- Evaluate the patient’s response. Remove cotton ball after 10 to 15 minutes, or per order. Assess drainage.
6.5.4 NASAL INSTILLATIONS
Nasal instillations are used to treat allergies, sinus infections, and nasal congestion. Medications with a systemic effect, such as vasopressin, may also be prepared as a nasal instillation.
SKILL: INSTILLING NOSE DROPS
- Perform hand hygiene.
- Identify the patient.
- Explain the procedure to the patient.
- Put on gloves.
- Provide the patient with paper tissues and ask that the patient blow his or her nose before instilling the nose drops.
- Have the patient sit up with head tilted well back. If the patient is lying down, tilt the head back over a pillow. These positions allow the solution to flow well back into the naris.
- Draw sufficient solution into the dropper for both nares. Excess solution should not be returned to a stock bottle.
- Hold up the tip of the nose and place the dropper just inside the naris about one third of an inch without touching the nare. Instill the prescribed number of drops in one naris and then into the other. Protect the dropper with a piece of soft tubing if the patient is an infant or young child. Touching the nares with the dropper may cause the patient to sneeze and contaminate the dropper.
- Have the patient remain in position with the head tilted back for a few minutes to prevent the solution from escaping.
- Remove gloves and perform hand hygiene.
- Document the medication administration on the MAR. Document the procedure, assessments, and patient response.
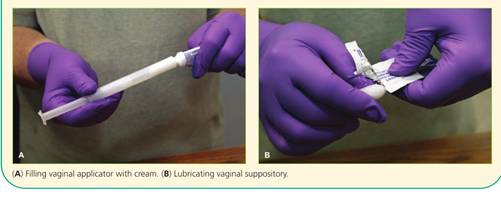
6.5.5 VAGINAL APPLICATIONS
Creams, foams, and tablets can be applied intravaginally using a narrow, tubular applicator with an attached plunger. Suppositories that melt when exposed to body heat are also administered by vaginal insertion.
SKILL: INSERTING VAGINAL SUPPOSITORY OR CREAM
-
- Perform hand hygiene.
- Identify the patient.
- Explain the procedure to the patient.
- Put on gloves.
- Fill a vaginal applicator with the prescribed amount of cream, or have a suppository ready.
- Introduce the applicator gently in a rolling manner while directing it downward and backward to follow the normal contour of the vagina for its full length. Push the plunger to its full length, and then gently remove the applicator with the plunger depressed. Insert a suppository with gloved fingers well into the vagina.
- Lubricate the applicator with water, as necessary. A suppository may be lubricated with a water-soluble gel.
- Ask patient to void before inserting medication.
- Use lithotomy position and provide draping.
- Spread the labia well with the fingers, and clean the area at the vaginal orifice with a washcloth and warm water to remove discharge. Use a different corner of the washcloth with each stroke, moving downward.
- Introduce the applicator gently in a rolling manner while directing it downward and backward to follow the normal contour of the vagina for its full length. Push the plunger to its full length, and then gently remove the applicator with the plunger depressed. Insert a suppository with gloved fingers well into the vagina.
- Ask the patient to remain in the supine position for 5 to 10 minutes after insertion.
- Offer the patient a perineal pad to collect excess drainage.
- Remove gloves and perform hand hygiene.
- Document the medication administration on the MAR. Document the procedure, assessments, and patient response.
6.5.6 RECTAL INSTILLATIONS
Rectal suppositories are used primarily for their local action, such as laxatives and fecal softeners. Systemic effects are also achieved with rectal suppositories.
SKILL: INSERTING A RECTAL SUPPOSITORY
- Perform hand hygiene.
- Identify the patient.
- Explain the procedure to the patient.
- Put on gloves.
- Assist the patient to his left side in a Sims position. Drape accordingly to expose only the buttocks.
- Remove the suppository from its wrapper. Apply lubricant to the rounded end. Lubricate the index finger of your dominant hand.
- Separate the buttocks with your nondominant hand and instruct the patient to breathe slowly and deeply through the mouth while the suppository is being inserted.
- Using your index finger, insert the suppository, round end first, along the rectal wall. Insert about 3 to 4 inches.
- Use toilet tissue to clean any stool or lubricant from around the anus. Release the buttocks. Encourage the patient to remain on his side for at least 5 minutes and retain the suppository for the appropriate amount of time for the specific medication.
- Remove gloves and perform hand hygiene.
- Document the medication administration on the MAR. Document the procedure, assessments, and patient response.
Administering Medications By Inhalation
Drugs for inhalation are aerosolized, delivered in small particles, and breathed in by the patient.
The lungs are supplied richly with blood and have a large surface area. These characteristics allow drugs to be absorbed easily from the lower respiratory tract.
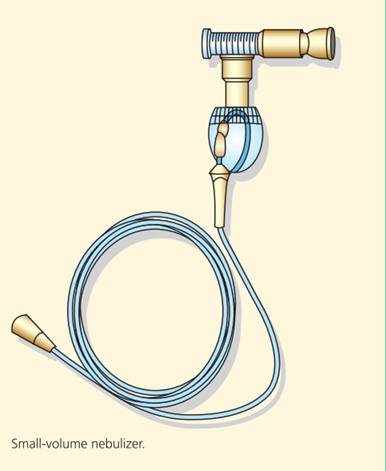
Drugs for inhalation may be administered by a hand atomizer or a nebulizer. These devices break up the medication into a mist for more efficient inhalation.
SKILL: USING THE SMALL-VOLUME NEBULIZER
- Perform hand hygiene.
- Identify the patient.
- Explain the procedure to the patient.
- Remove the nebulizer cup from the device, open it, and place it on a flat working surface.
- Place premeasured unit dose medication in the bottom section of the cup or use a dropper to place concentrated dose of medication in cup and add prescribed fluid to dilute it.
- Screw the top portion of nebulizer cup back in place and attach the cup to the nebulizer.
- Attach one end of tubing to the stem on the bottom of the nebulizer cuff and the other end to the air compressor or oxygen source (if valve to control airflow is not available, a Y tube can be added to the tubing so that one branch of the Y tube connects to the nebulizer cup and the other branch is left open).
- Turn on the air compressor or oxygen.
- Check that a fine medication mist is produced by opening valve or placing thumb over open branch of Y tube.
- Place mouthpiece into mouth and grasp securely with teeth and lips.
- Inhale slowly through the mouth (a nose clip may be necessary if patient is also breathing through the nose).
- Hold each breath for 5 to 10 seconds or as long as possible before exhaling.
- Continue this inhalation technique until all medication in the nebulizer cup has been aerosolized (usually about 15 minutes).
- If desired, gargle with tap water after using nebulizer.
- Rinse the equipment in warm water and allow to air dry on a clean towel.
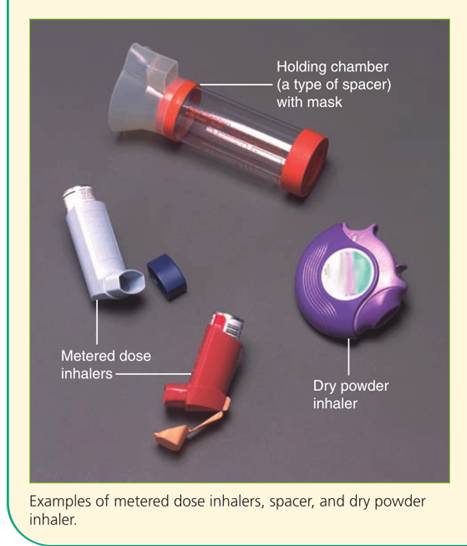
SKILL: USING THE METERED-DOSE INHALER
- Perform hand hygiene.
- Identify the patient.
- Explain the procedure to the patient.
- Remove the mouthpiece cover and shake inhaler well.
- Follow caregiver’s or manufacturer’s recommendations for placement of the mouthpiece. Two methods are possible:
- Hold the inhaler 1 to 2 inches in front of open mouth; or
- Place mouthpiece into mouth grasping securely with teeth and lips (an MDI coupled with a spacer or extender is always placed in the mouth).
- Take a deep breath and exhale.
- Inhale slowly and deeply through the mouth. Press down on the medication canister while continuing to inhale a full breath (when using a spacer or extender, depress the canister about one fourth or one third through the inspiration).
- Hold your breath for 5 to 10 seconds or as long as possible.
- Exhale slowly through pursed lips.
- If another puff is prescribed, wait 1 to 5 minutes before the next inhalation.
- If desired, gargle with tap water and blow nose into a tissue to remove any remaining trace of medication. If MDI is a steroid, this must be done to prevent oral fungal infection.
- Use mild soap and water to clean the mouthpiece, rinse it, and let it dry before replacing it.
- Follow physician’s order regarding frequency of inhaler use.
SKILL: USING THE DRY POWDER INHALER (DPI)
- Understand the specific instructions for your DPI.
- Perform hand hygiene.
- Identify the patient.
- Explain the procedure to the patient.
- Remove the cap and load a dose if necessary.
- Seal your lips around the mouthpiece.
- Do not block the opening with your tongue or teeth.
- Breathe in quickly and deeply, over 2 to 3 seconds.
- Remove the DPI from your mouth.
- Hold your breath for 5 to 10 seconds, or as long as possible.
- If a second dose is necessary, wait 1 to 5 minutes.
- Rinse your mouth or brush your teeth after using.
- Never exhale into the mouthpiece.
- If mist can be seen from the mouth or nose, the DPI is being used incorrectly.
- Keep the cap in place to prevent dirt from entering the DPI.
- Follow the manufacturer’s directions to clean the DPI.
Preventing And Responding To Medication Errors
Nurses should take every precaution to avoid errors when administering therapeutic agents.
Common types of medication errors include the following:
-
- Inappropriate prescribing of the drug (e.g., incorrect dose, quantity, or route, or inadequate instruction)
- Extra, omitted, or wrong doses
- Administration of a medication to a patient that was not ordered for him or her.
- Administration of a drug by an incorrect route or at an incorrect rate
- Failure to give a medication within the prescribed time interval
- Incorrect preparation of a drug before administration
- Improper technique when administering a drug
- Giving a drug that has deteriorated
Nursing insights
Medication errors occur most often at points of transition in care: on admission to a hospital, at transfer from one department to another, and at discharge home or to another facility.
The principal cause of medication error at these times is the incorrect or incomplete transfer of medication information.
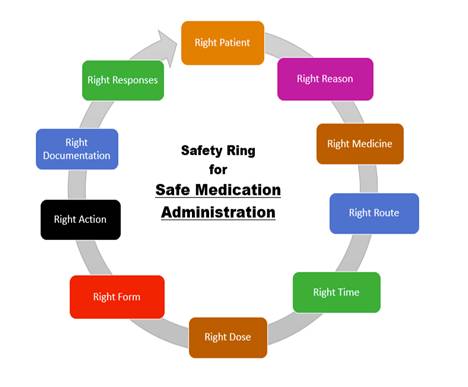
7.1 THE TEN RIGHTS OF MEDICATION ADMINISTRATION
RIGHT MEDICATION
The medication given was the medication ordered.
RIGHT DOSE
- The dose ordered is appropriate for the client.
- Give special attention if the calculation indicates multiple pills/ tablets or a large quantity of a liquid medication. This can be an indication that the math calculation may be incorrect.
- Double-check calculations that appear questionable.
- Know the usual dosage range of the medication.
- Question a dose outside of the usual dosage range.
RIGHT TIME
- Give the medication at the right frequency and at the time ordered according to agency policy.
- Medications should be given within the agency guidelines.
RIGHT ROUTE
- Give the medication by the ordered route.
- Make certain that the route is safe and appropriate for the client.
RIGHT CLIENT
- Medication is given to the intended client.
- Check the client’s identification band with each administration of a medication.
- Know the agency’s name alert procedure when clients with the same or similar last names are on the nursing unit.
RIGHT CLIENT EDUCATION
Explain information about the medication to the client (e.g., why receiving, what to expect, any precautions).
RIGHT DOCUMENTATION
- Document medication administration after giving it, not before.
- If time of administration differs from prescribed time, note the time on the MAR and explain the reason and follow-through activities (e.g., pharmacy states medication will be available in 2 hours) in nursing notes.
- If a medication is not given, follow the agency’s policy for documenting the r eason why.
RIGHT TO REFUSE
- Adult clients have the right to refuse any medication.
- The nurse’s role is to ensure that the client is fully informed of the potential consequences of refusal and to communicate the client’s refusal to the health care provider.
RIGHT ASSESSMENT
- Some medications require specific assessments prior to administration (e.g., apical pulse, blood pr essure, lab results).
- Medication orders may include specific parameters for administration (e.g., do not give if pulse less than 60 or systolic blood pressure less than 100).
RIGHT EVALUATION
Conduct appropriate follow-up (e.g., was the desired effect achieved or not? Did the client experience any side effects or adverse reactions?)
The following steps are recommended when a medication error occurs:
1. Check the patient’s condition immediately when the error is noted. Observe for the development of adverse effects related to the error.
2. Notify the nurse manager and the primary care provider to discuss possible courses of action, depending on the patient’s condition.
3. Write a description of the error on the patient’s medical record, including remedial steps that are taken.
4. Complete the form used for reporting errors, as dictated by facility policy. These forms, called special event, event, or unusual occurrence reports, require an objective, complete account of the medication error. Include the steps taken after the error was recognized. For legal reasons, describe the error fully and accurately. Medication errors are a common allegation in nursing liability cases. Do not document in the patient’s record the fact that an incident report was filed.
7.2 TEACHING ABOUT MEDICATIONS AND ABUSE
|
Health Topic |
Teaching Tip |
Why Is This Important? |
|
General information |
Medication name and dosage • Intended effects of medication • Expected adverse effects of medication |
Patients should know the names and reasons for medications in case of medical emergencies. Patients should also know expected adverse effects of the medication so they do not stop taking the medication. |
|
Taking the medication |
Medications should be taken at the same time every day. • Teach whether food, beverages, or other medications have any effect on the medication. • Teach what patient should do if a dose is missed. • Teach patient to take medications as prescribed for as long as prescribed. • Teach not to alter drug dosage without consulting healthcare provider. |
If patients make taking medications a part of their daily routine, they are less likely to miss a dose. Some medications require food to prevent stomach irritation; absorption of other medications is impeded by food in the stomach. Patients are likely to miss a dose of medication and need to know what to do if this happens. Some medications have severe consequences if stopped abruptly; others need to be taken for a set period of time and at a recommended dosage to be effective. |
|
Special instructions |
Teach what to do when adverse effects occur. • Keep medications with them when traveling. • Do not share medications with other people. • Proper storage • Keep a list of all medications, including OTC drugs, dietary supplements, herbs, and natural supplements. |
Patients need to know whom to contact if any adverse effects occur. Luggage can be lost or misplaced. Teach patients that just because someone else has similar symptoms, it does not mean that the same medication should be taken. Medication should be kept out of the reach of children and pets. For labeling purposes, medications should be kept in the container in which they were dispensed. Some medications are sensitive to humidity and light; keep medications in a cool, dry place. Keep your healthcare providers up to date about your list. |
Summary
- Medications have several names. Nurses need to know the generic and trade names of a medication and be aware of both its therapeutic and side effects.
- Federal drug legislation regulates the production, prescription, distribution, and administration of drugs.
- Nurse practice acts define limits on the nurse’s responsibilities regarding medications.
- Various routes are used to administer medications: oral, sublingual, buccal, parenteral, topical, or via a nasogastric or gastrostomy tube. When administering a medication, the nurse must ensure that it is appropriate for the route specified.
- Medication orders must include the client name; date and time the order is written; name of the medication; dosage, frequency, and route of administration; and signature of the ordering primary care provider or nurse. Nurses must question any unclear orders before implementing the order.
