
Please set your exam date
PARENTERAL ADMINISTRATION - Safe Preparation Of Parenteral Medications, Subcutaneous, Intramuscular And Intravenous Route
Study Questions
Practice Exercise 1
Which of the following best describes the Z-track intramuscular injection technique?
Explanation
The Z-track method is a specialized intramuscular (IM) injection technique used to prevent medication leakage into subcutaneous tissues, which can lead to tissue irritation, staining, or discomfort. This technique is especially important when administering medications that are irritating or that can stain the skin, such as iron dextran. Nurses must understand the proper anatomical and procedural steps to ensure safe, effective delivery and minimize patient complications.
Rationale for correct answer:
C. Displace the skin laterally before injection and release after to seal medication:
This accurately describes the Z-track technique. Pulling the skin laterally creates a zigzag path that traps the medication in the muscle and prevents backflow into subcutaneous tissue, reducing irritation and promoting proper absorption.
Rationale for incorrect answers:
A. Insert needle at a 45° angle to minimize pain:
A 45° angle is used for subcutaneous injections, not intramuscular ones. IM injections, including the Z-track method, require a 90° angle to ensure the medication reaches deep muscle tissue, where it can be absorbed properly.
B. Inject medication slowly into subcutaneous tissue to prevent leakage:
The Z-track technique is not used for subcutaneous injections. Injecting into subcutaneous tissue is inappropriate for medications that require deep muscle absorption, and leakage is more likely to occur if the medication is not placed intramuscularly.
D. Use a tuberculin syringe for small volumes and precise dosing:
Tuberculin syringes are typically used for intradermal or very small subcutaneous injections, not for IM injections. The Z-track method requires a standard IM syringe and needle suitable for deep tissue penetration.
Take-home points:
- The Z-track technique is used to prevent medication leakage into subcutaneous tissue.
- Pulling the skin laterally before injection creates a sealed, zigzag path.
- Use a 90° angle with a proper IM needle—not a tuberculin syringe—for this method.
What is the preferred site for intramuscular injections in adults and why?
Explanation
When administering intramuscular (IM) injections to adults, selecting the safest and most effective site is essential to prevent nerve damage, ensure proper absorption, and minimize complications. The nurse must be knowledgeable about anatomical landmarks and surrounding structures such as blood vessels and nerves. Among the available sites, one stands out for its safety and reliability due to reduced risk of injury and consistent muscle mass.
Rationale for correct answer:
C. Use a 25G ⅝ inch needle at a 90° angle into the abdomen:
The preferred technique for administering subcutaneous heparin is to use a small-gauge (25-27G), ⅜–⅝ inch needle inserted at a 90° angle into the abdomen, at least 2 inches away from the umbilicus. The abdominal area has sufficient subcutaneous tissue and is ideal for slow, consistent absorption.
Rationale for incorrect answer:
A. Deltoid, because it allows for higher volume administration:
The deltoid site is commonly used for vaccinations, but it is limited to small-volume injections (usually ≤1 mL). It does not accommodate larger volumes well and carries a higher risk of injuring the radial nerve if not properly located.
B. Vastus lateralis, due to proximity to nerves:
Although the vastus lateralis is safe for infants and children, this answer is misleading. Its proximity to nerves is a concern, not a benefit. It’s used when the ventrogluteal site is not suitable, but it is not the first choice for adults.
C. Ventrogluteal, due to minimal nerve and vascular structures:
The ventrogluteal site is the preferred IM injection site for adults because it has a thick muscle mass, is far from major nerves (like the sciatic nerve) and blood vessels, and is easily identified using bony landmarks. It allows for larger volumes and deeper injections with minimal risk of complications.
D. Rectus femoris, because it's easiest to access:
While this muscle is accessible, particularly in self-administration or when other sites are contraindicated, it is not typically recommended due to discomfort and the potential for inconsistent absorption. It is not the safest or most preferred option for IM injections.
Take-home points:
- The ventrogluteal site is the safest and most recommended for IM injections in adults.
- It avoids major nerves and blood vessels, reducing the risk of injury.
- The deltoid and rectus femoris have limitations and are less suitable for larger volume injections.
A nurse is administering heparin subcutaneously. Which technique is most appropriate?
Explanation
Administering heparin subcutaneously requires specific techniques to minimize tissue trauma, ensure accurate delivery, and reduce the risk of hematoma or bleeding. Heparin is an anticoagulant, so care must be taken with needle selection, site choice, and injection angle. Nurses must follow evidence-based protocols to prevent complications.
Rationale for correct answer:
3. Use a 25G ⅝ inch needle at a 90° angle into the abdomen:
The preferred technique for administering subcutaneous heparin is to use a small-gauge (25-27G), ⅜–⅝ inch needle inserted at a 90° angle into the abdomen, at least 2 inches away from the umbilicus. The abdominal area has sufficient subcutaneous tissue and is ideal for slow, consistent absorption.
Rationale for incorrect answer:
A. Aspirate after inserting the needle to confirm placement:
Aspirating during a subcutaneous injection, especially with heparin, is not recommended because it may cause bruising and tissue damage. Heparin is a high-risk medication, and aspiration increases the chance of bleeding at the injection site.
B. Administer in the deltoid muscle:
Heparin is not given intramuscularly due to the risk of hematoma formation. The deltoid is an intramuscular site, making it inappropriate for subcutaneous administration of anticoagulants like heparin.
D. Shake the heparin vial to ensure the drug is evenly distributed:
Shaking heparin can damage the molecular structure of the drug and increase the risk of foaming or bubbles, which could alter dosage accuracy. Heparin should be gently rolled if mixing is necessary.
Take-home points:
- Heparin should be administered subcutaneously using a 25G ⅝ inch needle at a 90° angle into the abdomen.
- Aspiration is not recommended when giving heparin due to bleeding risk.
- Heparin must not be shaken; gentle handling preserves drug stability and potency.
Which of the following is the most appropriate IM injection site for a 3-month-old infant?
Explanation
Selecting an appropriate intramuscular (IM) injection site in infants is a critical component of safe medication administration. The choice is guided by the infant’s muscle development, risk of nerve or vascular injury, and the volume of medication to be administered. At 3 months of age, only specific sites are safe and anatomically accessible.
Rationale for correct answer:
4. Vastus lateralis:
The vastus lateralis muscle, located on the anterolateral aspect of the thigh, is the safest and most well-developed IM site in infants under 12 months. It can accommodate the volume typically used in pediatric injections and avoids critical nerves or blood vessels, making it the preferred site for IM injections in a 3-month-old.
Rationale for incorrect answer:
1. Deltoid:
The deltoid muscle is underdeveloped in infants and is not recommended for IM injections until the child is older (typically over 18 months), due to its small size and limited capacity for medication volume.
2. Ventrogluteal:
Although the ventrogluteal site is preferred in adults and older children because of its safety and distance from major nerves and vessels, it requires more muscle development than is present in a 3-month-old infant. It may be used in older infants if muscle mass is sufficient, but not at 3 months.
3. Dorsogluteal:
This site should be avoided in infants and children due to the proximity to the sciatic nerve and major blood vessels, which poses a high risk of nerve injury or vascular complications.
Take-home points:
- The vastus lateralis is the safest and most appropriate site for IM injections in infants under 12 months.
- Avoid the deltoid and dorsogluteal sites in young infants due to insufficient muscle and risk of nerve damage.
- Site selection for IM injections in infants is based on muscle development, safety, and medication volume.
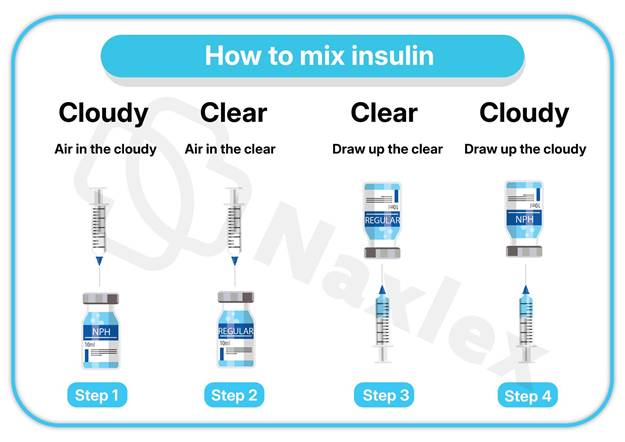
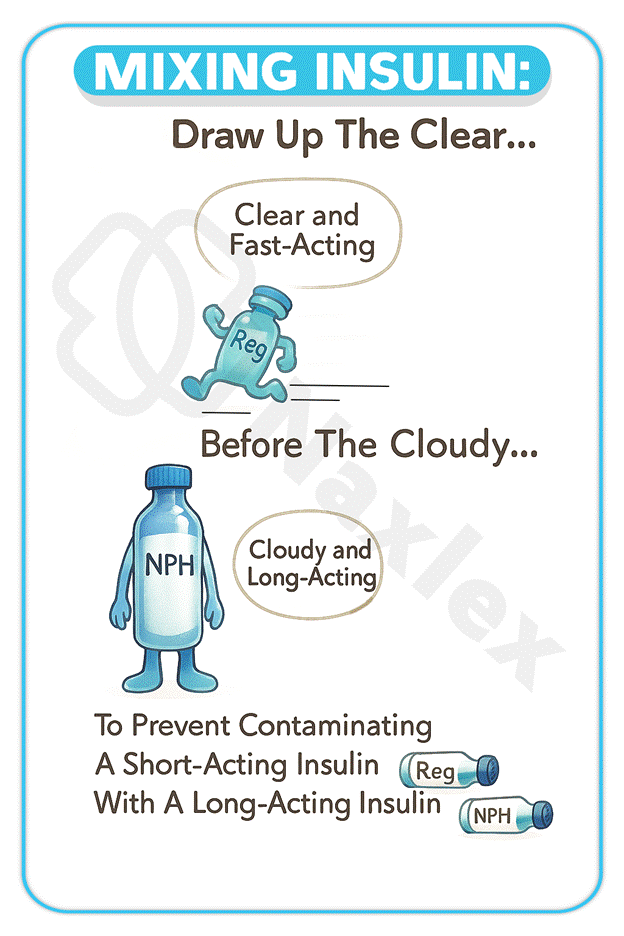
A nurse must give two types of insulin in the same syringe. What is the correct order of preparation?
Explanation
When administering two types of insulin in the same syringe—typically a rapid- or short-acting insulin (clear) and an intermediate-acting insulin (cloudy)—nurses must follow a specific preparation sequence to maintain medication efficacy and safety. The proper order ensures that the short-acting insulin is not contaminated by the longer-acting one.
Rationale for correct answer:
3. Draw up clear first, then cloudy:
This is the safe and recommended technique. After injecting air into both vials (cloudy first, then clear), the nurse draws up the clear (short-acting) insulin before the cloudy (intermediate-acting). This avoids contamination and ensures proper insulin action.
Rationale for incorrect answer:
1. Draw up cloudy first, then clear:
This sequence risks contaminating the vial of short-acting insulin (clear) with intermediate-acting insulin (cloudy), altering its pharmacokinetics. Clear insulin must remain uncontaminated for precise glucose control.
2. Draw up air into both, then inject cloudy:
Air should be injected into both vials, but the order matters. Air should be injected into the cloudy vial first (without drawing), then into the clear vial, followed by drawing up the clear insulin. This option omits essential steps and implies drawing up insulin in the wrong order.
4. Mix both in the vial before drawing up:
Mixing both types of insulin in the vial is never recommended. Each type has a distinct action and formulation, and combining them in a vial compromises the effectiveness and stability of the insulins
Take-home points:
- Always draw up clear insulin before cloudy to prevent contamination of the fast-acting insulin.
- Inject air into the cloudy vial first, then into the clear vial before drawing insulin.
- Never mix insulins inside the vial—combining occurs only within the syringe following proper technique.
Practice Exercise 2
Which IV fluid is most appropriate for treating a patient with hypernatremia?
Explanation
Hypernatremia occurs when serum sodium levels are elevated, typically above 145 mEq/L. Treatment focuses on gradual correction of sodium levels and rehydration using hypotonic solutions, which promote a shift of water into cells and help dilute serum sodium.
Rationale for correct answer:
3. D5W (5% Dextrose in Water):
Although D5W is technically isotonic in the bag, it behaves as a hypotonic solution once the dextrose is metabolized. It provides free water, which helps dilute elevated serum sodium levels, making it appropriate for gradual correction of hypernatremia.
Rationale for incorrect answer:
1. 0.9% Normal Saline:
This isotonic solution contains sodium and chloride concentrations close to plasma levels. Administering it to a patient with hypernatremia could exacerbate the elevated serum sodium levels rather than dilute them.
2. 3% Hypertonic Saline:
This solution contains a high concentration of sodium and is typically used for hyponatremia, not hypernatremia. Administering it to a hypernatremic patient would dangerously increase serum sodium levels and worsen the condition.
4. Lactated Ringer’s:
While this isotonic fluid contains electrolytes, including sodium, it is not ideal for treating hypernatremia. It can maintain or even raise serum sodium concentrations, depending on the patient's fluid and electrolyte status.
Take-home points:
- D5W provides free water that helps dilute elevated serum sodium in hypernatremia.
- Avoid isotonic or hypertonic saline when sodium levels are already high.
- Always correct hypernatremia gradually to prevent cerebral edema and neurologic complications.
A nurse observes redness and a palpable cord along the patient’s IV site. What complication is suspected?
Explanation
Phlebitis is a common complication of IV therapy that involves inflammation of the vein, often caused by mechanical, chemical, or infectious irritation. Early recognition of symptoms such as redness, warmth, and a palpable cord along the vein is essential for preventing further complications.
Rationale for correct answer:
3. Phlebitis:
Phlebitis is inflammation of the vein, typically presenting with redness, warmth, tenderness, and a palpable cord along the vein. These symptoms indicate irritation or trauma from the catheter or infused solutions.
Rationale for incorrect answer:
1. Infiltration:
Infiltration occurs when IV fluid leaks into surrounding tissue, causing swelling, pallor, and coolness. A palpable cord and redness are not characteristic findings.
2. Speed shock:
This is a systemic reaction to rapid IV medication administration, presenting with symptoms like dizziness, chest tightness, and hypotension—not localized inflammation or vein tenderness.
4. Catheter embolism:
A catheter embolism involves the breakage and migration of a catheter fragment. It may cause acute pain or vascular compromise but does not cause localized redness with a palpable cord.
Take-home points:
- Phlebitis presents with redness, warmth, and a palpable vein cord.
- Prompt intervention includes removing the IV, applying warm compresses, and documenting findings.
- Monitor IV sites regularly to detect complications early and prevent progression.
What gauge catheter is most appropriate for rapid fluid resuscitation?
Explanation
In emergency situations like hypovolemic shock or trauma, rapid fluid resuscitation is critical. This requires a large-bore intravenous (IV) catheter, which allows high-volume, fast flow rates of fluids or blood products to restore intravascular volume quickly.
Rationale for correct answer:
A. 14G:
A 14-gauge catheter is the largest commonly used peripheral IV size and is ideal for rapid volume resuscitation. It allows the highest flow rate, which is crucial in emergencies like hemorrhage or shock to quickly restore circulating volume.
Rationale for incorrect answers:
B. 20G:
A 20-gauge catheter is suitable for general IV fluid administration, medications, and blood transfusions but does not support the same flow rate as a 14G. It is not the first choice in a resuscitation scenario.
C. 22G:
A 22-gauge catheter is used for smaller or fragile veins, often in pediatric or elderly patients. It is not designed for high-volume infusion and would delay fluid administration in critical situations.
D. 24G:
A 24-gauge catheter is the smallest and is used for very small veins, typically in infants. It is unsuitable for rapid fluid resuscitation due to its minimal flow capacity.
Take-home points:
- Use a large-bore (14G or 16G) catheter for rapid fluid resuscitation to maximize flow rate.
- In emergencies, prioritize veins that can support large-gauge catheters, such as the antecubital site.
- Smaller gauge numbers indicate larger catheter diameters and faster infusion capabilities.
What action is most appropriate when an air embolism is suspected during IV therapy?
Explanation
An air embolism during IV therapy is a medical emergency caused by air entering the venous circulation, potentially blocking blood flow to vital organs. The left lateral Trendelenburg position helps trap air in the right atrium, preventing it from entering the pulmonary circulation and causing respiratory or cardiac complications.
Rationale for correct answer:
3. Position the patient in left lateral Trendelenburg:
This position helps trap the air in the right atrium and prevents it from reaching the pulmonary arteries, minimizing the risk of a fatal embolism. It's the most effective initial action.
Rationale for incorrect answer:
1. Place the patient in a supine position with head elevated:
This position does not effectively trap air in the heart and may allow air to move into the pulmonary circulation, increasing the risk of embolism.
2. Elevate the legs and apply oxygen:
While oxygen is appropriate, elevating the legs can worsen the embolism by facilitating air movement toward the heart or lungs. It’s not the primary positioning intervention.
4. Flush the line and resume infusion:
Flushing the IV line can force more air into the circulation, worsening the situation. The infusion should be immediately stopped, not resumed.
Take-home points:
- Air embolism requires immediate positioning in left lateral Trendelenburg.
- Stop the infusion immediately and notify the provider—do not flush the line.
- Air embolism signs may include dyspnea, chest pain, tachycardia, or hypotension.
Which technique ensures compatibility when administering multiple IV medications?
Explanation
When administering multiple IV medications, ensuring drug compatibility is essential to avoid precipitation, inactivation, or adverse reactions. The saline flush technique is used to clear the line between medications, helping maintain medication integrity and patient safety.
Rationale for correct answer:
3. Flush the line with saline between medications:
Flushing with saline prevents mixing of incompatible medications, clears the line, and is the safest and most effective technique for maintaining compatibility.
Rationale for incorrect answer:
1. Use a filter needle for each drug:
Filter needles are used to prevent particulates during drawing up medication, not to ensure compatibility between drugs during IV administration.
2. Mix all drugs in the same syringe:
Mixing drugs can lead to chemical incompatibilities, precipitation, or toxicity, and is never done without confirmed compatibility.
4. Administer them simultaneously through a Y-port:
Simultaneous administration without assessing compatibility can result in interactions between drugs, potentially causing clots or inactivation.
Take-home points:
- Always flush IV lines with saline between medications to prevent drug incompatibility.
- Never mix medications unless compatibility is confirmed.
- Proper flushing technique helps maintain IV line patency and patient safety.
Practice Exercise 3
What feature of smart infusion pumps enhances medication safety?
Explanation
Smart infusion pumps are equipped with advanced safety features, most importantly drug libraries with dosing limits, which help prevent medication errors by alerting clinicians to doses outside recommended parameters.
Rationale for correct answer:
1. Touchscreen navigation:
While it improves usability, it does not directly enhance medication safety.
2. Audio alerts:
These can notify the nurse of issues, but without a drug library, the alerts are not tailored to medication-specific errors.
3. Drug libraries with dosing limits:
These are evidence-based databases built into the pump that help automatically verify dosing parameters, reducing the risk of infusion-related errors and enhancing patient safety.
4. Wireless battery backup:
This supports continued operation, but it doesn’t help detect or prevent dosing mistakes.
Take-home points:
- Drug libraries in smart pumps provide dose range checking, enhancing infusion safety.
- They prevent medication errors by alerting staff to out-of-range dosages.
- Smart pumps support safe IV therapy through built-in clinical decision support systems.
A nurse is assessing a client’s IV site. Which of the following findings is indicative of phlebitis? Select all that apply
Explanation
Phlebitis is inflammation of the vein often caused by IV irritation, mechanical trauma, or infection. Nurses must monitor for localized signs such as pain, erythema, and a palpable cord to prevent complications like thrombophlebitis
Rationale for correct answer:
C. Palpable, hard mass above insertion site
This finding suggests a cord-like vein, which is characteristic of thrombophlebitis. Inflammation and potential clot formation can lead to a hardened vein that is tender to touch.
E. Pain at site
Pain is a common early sign of phlebitis due to inflammation of the vein's inner lining. Clients may report tenderness or burning at the insertion site.
Rationale for incorrect answers:
A. Tingling sensation below insertion site
This is more commonly associated with nerve irritation or injury rather than phlebitis. It may indicate the IV is near a nerve or causing pressure on it but is not a hallmark sign of phlebitis.
B. Tachycardia
Tachycardia is a systemic response and not a localized sign of phlebitis. It may occur with serious infections like septicemia, but phlebitis usually presents with localized symptoms first.
D. Cool, pale skin
Coolness and pallor indicate infiltration, not phlebitis. Infiltration occurs when IV fluid leaks into surrounding tissue, causing decreased perfusion and temperature in the area.
Take-home points:
- Phlebitis is indicated by pain, redness, warmth, and sometimes a palpable cord.
- Cool and pale skin is more consistent with infiltration, not phlebitis.
- Prompt recognition helps prevent progression to thrombophlebitis or infection.
A nurse manager is reviewing facility policies for IV therapy management with the members of his team. The nurse manager should inform the team members that which of the following techniques will minimize the risk of catheter embolism?
Explanation
Catheter embolism is a serious IV complication where a fragment of the catheter breaks off into the vascular system. Avoiding reinsertion of the needle into the catheter is essential to prevent shearing and minimize embolism risk.
Rationale for correct answer:
D. Avoid reinserting the needle into an IV catheter
Reinserting a needle into a flexible IV catheter can shear or cut the catheter material, increasing the risk of a catheter embolism. This technique should be avoided to prevent the catheter from fragmenting and entering the bloodstream.
Rationale for incorrect answers:
A. Perform hand hygiene before and after IV insertion
Hand hygiene is essential for preventing infection, such as local site infections or sepsis, but it does not directly prevent catheter embolism, which involves a broken catheter fragment entering the circulation.
B. Rotate the IV sites at least every 72 hr
Regular rotation of IV sites helps prevent complications like phlebitis and infiltration. However, it does not directly reduce the risk of catheter fragmentation or embolism.
C. Minimize tourniquet time
Reducing tourniquet time helps prevent vein overdistention or injury but does not significantly influence the risk of catheter breakage or embolism.
Take-home points:
- Catheter embolism can occur if the needle is reinserted into a flexible catheter, causing breakage.
- Preventive practices should focus on avoiding trauma to the catheter itself.
- Hand hygiene and site rotation prevent infection, not catheter embolism.
A nurse is preparing to initiate IV therapy for an older adult client. Which of the following actions should the nurse plan to take?
Explanation
3. Distend the veins by using a blood pressure cuff
A blood pressure cuff inflated just below diastolic pressure offers controlled, even pressure and is often more comfortable and effective than a tourniquet, especially in older clients with fragile veins. This promotes vein visibility and access without over-distention.
Rationale for incorrect answer:
Rationales:
1. Use a disposable razor to remove excess hair on the extremity
Shaving with a razor can cause microabrasions and increase the risk of infection. If hair removal is necessary, it is safer to clip the hair rather than shave it.
2. Select the back of the client’s hand to insert the IV catheter
Older adults have fragile veins, particularly on the back of the hand. Using this site increases the risk of infiltration or vein rupture. Veins in the forearm are usually better choices due to more stability and tissue support.
4. Direct the client to raise his arm above his heart
Raising the arm above the heart level decreases venous return, causing veins to collapse. This technique is not recommended when attempting venous access, as it makes cannulation more difficult.
Take-home points:
- Use a blood pressure cuff to distend fragile veins in older adults, as it offers gentle, even pressure.
- Avoid shaving with razors to prevent skin injury and infection—clip hair instead if needed.
- Select stable veins in the forearm rather than the hand to reduce infiltration risk in elderly clients
A nurse is caring for a client receiving dextrose 5% in water IV at 250 mL/hr. Which of the following findings are an indication of fluid overload? (Select all that apply.)
Explanation
Rationale for correct answers:
C. Shortness of breath
Fluid overload increases intravascular volume, leading to pulmonary congestion and impaired gas exchange. This results in dyspnea and respiratory distress.
D. Crackles heard in lungs
Excess fluid can leak into the alveoli, causing pulmonary edema. Crackles (rales) on auscultation are a classic sign of fluid accumulation in the lungs.
E. Distended neck veins
Increased circulating volume raises venous pressure, leading to jugular venous distention, a key indicator of fluid overload.
Rationales for incorrect answers:
A. Hypotension
Fluid overload typically causes hypertension due to increased circulating volume, not hypotension.
B. Bradycardia
Fluid overload is more commonly associated with tachycardia as the heart compensates for increased volume. Bradycardia is not a typical finding.
Take-home points:
• Fluid overload commonly presents with respiratory symptoms such as dyspnea and crackles.
• Jugular venous distention is a key sign of increased intravascular volume.
• Monitor IV fluids closely, especially hypotonic solutions like D5W, to prevent fluid overload.
Comprehensive Questions
The nurse preparing an IM injection to be administered will provide accurate and safe medication practices by following which principles? Select all that apply.
Explanation
When administering intramuscular (IM) injections, nurses must integrate clinical judgment, pharmacological knowledge, and safety protocols to prevent complications and achieve desired therapeutic outcomes. Proper medication administration extends beyond simply delivering the drug—it involves understanding the drug’s purpose, evaluating patient-specific factors, and anticipating outcomes.
Rationale for correct answer:
1. Performing premedication assessment:
A thorough premedication assessment allows the nurse to identify contraindications, allergies, and baseline data that may influence how the patient responds to the medication. This ensures that the IM injection is safe and appropriate for the current clinical status.
2. Being knowledgeable about the reason the medication is given:
Knowing the indication for the medication helps the nurse verify the appropriateness of the order, anticipate therapeutic effects, and educate the patient. It also enhances safety by helping the nurse identify potential adverse reactions.
4. Understanding how the medication will work:
Pharmacodynamic and pharmacokinetic understanding allows the nurse to anticipate when the medication should take effect, recognize expected outcomes, and detect early signs of adverse effects or toxicity.
5. Evaluating the therapeutic outcome desired:
Assessment after administration is crucial to determine whether the medication achieved the intended effect. Ongoing evaluation guides the need for continued therapy or adjustments in the medication regimen.
6. Exercising clinical judgment regarding changes in the client’s condition:
Clinical changes may affect the medication’s safety or effectiveness. Nurses must reassess and potentially hold or adjust medications in response to significant changes in the patient’s condition or lab values.
Rationale for incorrect answer:
3. Administering the injection using clean technique:
While clean technique may reduce contamination, sterile technique is the standard for IM injections to prevent infections at the injection site. Clean technique alone does not ensure full adherence to safe injection practices.
Take-home Points:
- IM injections require sterile technique to prevent complications like infection or tissue damage.
- Nurses must assess, understand, and evaluate every step of the medication process—from reason for administration to therapeutic effect.
- Sound clinical judgment is essential when tailoring medication decisions to a patient’s changing condition.
The nurse is preparing to give an injection into the client’s abdomen for the early morning insulin dose. Which needle length and gauge is most appropriate to use?
Explanation
Subcutaneous (SubQ) injections such as insulin require specific equipment and technique to ensure proper absorption and patient safety. The nurse must choose a needle length and gauge suitable for delivering medication into the subcutaneous tissue, particularly in common sites like the abdomen, where insulin is frequently administered.
Rationale for correct answer:
D. 25 gauge, ⅝ inch:
This is the most appropriate choice for a subcutaneous insulin injection in the abdomen. The 25-gauge needle is fine enough to reduce discomfort, and the ⅝-inch length is suitable to reach the subcutaneous tissue without penetrating muscle.
Rationale for incorrect answer:
A. 18 gauge, 1½ inch:
This needle is too large in both gauge and length for subcutaneous injections. It is typically used for intramuscular injections or blood draws, and using it for insulin administration could increase pain, bruising, and risk of injecting into muscle.
B. 120 gauge, 1 inch:
There is no such thing as a 120-gauge needle in clinical practice. This option is not realistic or safe for any type of injection, including insulin, and should be disregarded entirely.
C. 22 gauge, ⅝ inch:
While the length may be suitable for some subcutaneous injections, a 22-gauge needle is still relatively thick and not ideal for insulin delivery, which requires a finer needle to minimize tissue trauma.
Take-home points:
- Prefilled syringes reduce preparation time and the risk of medication contamination.
- Special cartridge holders are needed to properly administer prefilled cartridges.
- Prefilled syringes come in standardized doses, improving safety but may be more costly than multidose vials.
The nurse is discussing with an orientee the advantages of the prefilled cartridge-needle units and syringes. Which statements by the nurse are accurate? Select all that apply
Explanation
Rationale for correct answers:
A. “The prefilled syringes require special cartridge holders.”
Certain prefilled cartridge systems (e.g., Carpuject, Tubex) require compatible holders for administration. This statement is accurate regarding equipment requirements.
B. “The prefilled syringes diminish the chance of contamination of the medication.”
Prefilled systems are manufactured under sterile conditions and reduce handling, thereby lowering the risk of contamination compared with drawing medication from vials or ampules.
D. “The prefilled syringes save the nurse the time it takes to prepare the injection.”
Because the medication is already measured and prepared, nursing preparation time is reduced, improving efficiency and workflow.
E. “The prefilled syringes contain a standard volume and strength of medication.”
Prefilled syringes provide a premeasured dose with standardized concentration, enhancing dosing accuracy and reducing medication errors.
Rationale for incorrect answer:
C. “The prefilled syringes are cheaper than the multidose vials.”
Prefilled syringes are generally more expensive than multidose vials due to manufacturing, packaging, and convenience features.
Take-home points:
• Prefilled syringes improve safety by reducing contamination and dosing errors.
• They enhance efficiency by eliminating medication preparation steps.
• Some systems require special holders or proprietary devices.
• Cost is typically higher than multidose vial systems.
The nurse needs to determine the difference between an ampule, a vial, and a Mix-O-Vial. Indicate with an arrow the technique used for the different parenteral dose forms.
|
DOSAGE FORMS |
TECHNIQUES USED |
|
Ampules |
dropdown
|
|
Vials |
dropdown
|
|
Mix-O-Vials |
dropdown |
|
|
|
Explanation
Parenteral medications come in different dosage forms—ampules, vials, and Mix-O-Vials—each requiring specific techniques to ensure safe and accurate medication withdrawal. Nurses must be able to distinguish between these forms and apply the correct handling method.
Rationale for correct answer:
Ampules are sealed glass containers that must be broken open to access the medication. Breaking the ampule can release microscopic glass shards. To prevent these particles from entering the syringe and being injected into the patient, nurses must use a filter needle or filter straw when withdrawing the medication.
Vials are closed systems sealed with a rubber stopper. When medication is withdrawn, the pressure inside the vial decreases. Injecting an equal volume of air before withdrawal equalizes pressure, preventing a vacuum from forming and allowing the medication to be drawn easily into the syringe.
Mix-O-Vials are dual-chambered containers that keep a powder and diluent separate until administration. To activate the Mix-O-Vial, the nurse must press down firmly on the top diaphragm, which breaks the seal between the chambers. This allows the diluent to mix with the powder, forming a solution that can then be withdrawn and administered.
Take-home points:
- Ampules require filter devices to prevent glass contamination.
- Air must be injected into vials to maintain pressure balance during withdrawal.
- Mix-O-Vials need activation by pushing the diaphragm to mix contents before use.
The nurse is teaching the client how to prepare 10 units of regular insulin and 5 units of NPH insulin for injection. List in the correct order the proper sequence for preparation that the nurse will describe to the client.
Explanation
When preparing a mixed dose of regular (short-acting) and NPH (intermediate-acting) insulin in one syringe, the nurse must follow a strict sequence to preserve medication integrity, avoid cross-contamination, and ensure safe administration. Proper technique minimizes dosage errors and supports stable blood glucose control.
Rationale for correct answer:
Wipe the tops of the insulin vials with alcohol
Cleaning the vial tops with an alcohol swab helps prevent introducing contaminants into the insulin solution when the needle is inserted. This is a key infection control step.
Inject appropriate volumes of air into the NPH vial and the regular insulin vial
Air is injected into each vial equal to the dose to be withdrawn. This maintains pressure balance and makes insulin withdrawal easier. Air should be injected into NPH first (cloudy), then regular (clear), but insulin should always be drawn from the regular vial first to prevent contaminating the clear insulin.
Withdraw 10 units of regular insulin into the syringe
Regular insulin (clear and short-acting) must be drawn first to avoid contamination with intermediate-acting NPH insulin, which is cloudy and contains a protein that alters absorption.
Withdraw 5 units of NPH insulin into the syringe to mix with the regular insulin
After the regular insulin has been drawn, the syringe is inserted into the NPH vial to withdraw the remaining dose. Drawing in this order avoids mixing the NPH with regular insulin inside the vials.
Mix the two insulins in the syringe by rolling between the palms and gently inverting the syringe several times
Gentle mixing helps ensure the NPH insulin, which tends to settle, is evenly distributed in the syringe. Vigorous shaking should be avoided as it can denature the insulin.
Inject the insulin in the proper subcutaneous site
The final step is administering the insulin subcutaneously, usually in the abdomen, thigh, or back of the arm. Site rotation helps prevent lipodystrophy and ensures consistent absorption.
Take-home points:
- Always draw clear (regular) insulin before cloudy (NPH) to prevent contamination.
- Inject air into both vials first, starting with NPH, then withdraw regular insulin.
- Roll insulin mixtures gently; never shake to preserve insulin integrity.
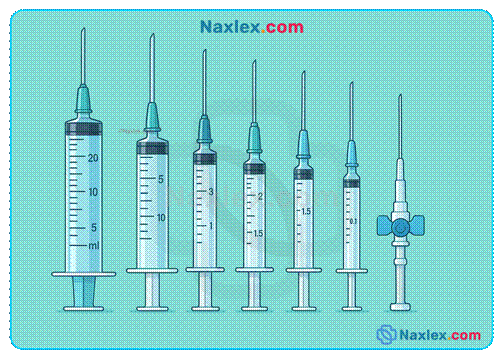
The nurse needs to determine which medications need to be in a tuberculin syringe and which need to be in a larger volume syringe. Indicate with an X which syringe would work.
Explanation
A tuberculin syringe is a small-volume syringe designed for the precise administration of low-dose medications, most commonly used for intradermal injections such as the Mantoux tuberculin skin test. It typically holds up to 1 mL of fluid and is calibrated in tenths and hundredths of a milliliter, allowing for accurate dosing of medications like vaccines, allergy tests, or pediatric medications.
Rationale for correct answer:
Subcutaneous injection (1.5 mL): A volume above 1 mL exceeds the capacity of a tuberculin syringe and should be given with a 3 mL syringe for safe administration.
Subcutaneous injection (0.5 mL): A tuberculin syringe (1 mL capacity) is ideal for small subcutaneous doses due to its fine calibration, allowing precise measurement.
Intradermal Mantoux test (0.1 mL): Requires a tuberculin syringe to ensure high precision for small-volume, shallow intradermal injections such as TB testing.
IM injection for nausea (2 mL): A larger syringe (e.g., 3–5 mL) is necessary for intramuscular delivery of this volume, which exceeds the tuberculin syringe capacity.
Take-home points:
- Use tuberculin syringes for volumes ≤1 mL, especially for intradermal or small subcutaneous doses.
- Larger volume syringes (≥3 mL) are required for IM injections or any dose over 1 mL.
- Always match syringe size to medication volume and route to ensure safe and accurate administration.
The nurse needs to mix two medications in the same syringe so that the client will only have to get one shot. List in order the steps necessary to mix two medications in one syringe.
Explanation
When a nurse needs to combine two compatible medications in a single syringe, it's essential to follow a structured process to maintain medication safety, dose accuracy, and sterility. This reduces the number of injections the patient receives and prevents complications from drug incompatibility or contamination.
Rationale for correct answer:
Check the compatibility of the two drugs:
Ensuring the medications are chemically and physically compatible avoids adverse reactions or drug inactivation.
Wipe off the tops of both vials:
Alcohol swabbing maintains aseptic technique before needle access to each vial.
Inject air into each vial equal to the volume to be withdrawn:
This prevents vacuum formation and makes it easier to withdraw the correct dose.
Withdraw the medication from the first vial:
Always draw from the first vial (usually the shorter-acting medication) before the second, to avoid contaminating the first vial.
Withdraw the medication from the second vial:
Insert the same needle into the second vial and carefully add the second medication to the same syringe without expelling air.
Mix the two medicines in the syringe by rolling between the palms and gently inverting:
Ensures that both medications are evenly distributed without creating air bubbles or froth.
Take-home points:
- Always check compatibility before combining two medications in one syringe
- Use aseptic technique consistently to prevent contamination.
- Follow a precise sequence to ensure safe mixing and accurate dosing.
The instructor asks the student nurse to gather the equipment needed to perform an intradermal injection. Which items are appropriate? Select all that apply.
Explanation
Intradermal (ID) injections are typically used for diagnostic procedures like tuberculin testing and allergy testing. The skin layer targeted is just beneath the epidermis, requiring precise technique and specially selected equipment to ensure accurate administration and patient safety.
Rationale for correct answer:
2. Tuberculin syringe:
Ideal for intradermal injections due to its 1 mL capacity and fine calibration, allowing for precise volume measurement.
3. ¼-inch needle:
Appropriate for ID injections because it is short enough to limit penetration into the dermal layer.
5. 26-gauge needle:
Suitable for ID injections due to its small diameter, which minimizes tissue trauma and is appropriate for superficial injection.
Rationale for incorrect answer:
1. 3-mL syringe:
Too large for intradermal use; ID injections require small volumes (≤1 mL), which are more accurately measured in smaller syringes.
4. 21-gauge needle:
This gauge is too large and traumatic for the delicate dermal tissue; typically used for intramuscular or IV access.
6. ⅝-inch needle:
Too long for intradermal use; better suited for subcutaneous injections.
Take-home points:
- Use a tuberculin syringe and a 26- to 27-gauge, ¼-inch needle for intradermal injections.
- Avoid long or large-gauge needles that risk delivering the medication too deeply.
- Intradermal injections require precision and minimal volume, so appropriate tools are crucial.
A student nurse has been practicing subcutaneous injections in the laboratory and is about to administer her first insulin injection. List in correct order the proper sequence to follow when administering a subcutaneous injection.
Explanation
Administering subcutaneous insulin safely and effectively requires preparation, precision, and adherence to safety protocols. It is critical to follow a logical, evidence-based sequence that ensures proper medication delivery, maintains asepsis, and supports patient-centered care.
Rationale for correct answer:
Identify the client using two identifiers: Ensures patient safety and aligns with national safety standards to prevent medication errors.
Explain procedure to client: Promotes informed consent, reduces anxiety, and encourages cooperation during the procedure.
Prepare the insulin per prescriber’s orders: Confirms the correct dose and type of insulin is drawn and ready for administration.
Locate the appropriate site for administration: Choosing a site with sufficient subcutaneous tissue helps ensure proper absorption and reduces complications.
Cleanse the site with alcohol: Reduces microbial load at the injection site and minimizes infection risk.
Dart the needle in at a 45- to 90-degree angle: The angle is based on needle length and patient's body fat; ensures proper placement in subcutaneous tissue.
Inject the insulin: Delivering the medication as ordered after confirming proper site and technique.
Withdraw the needle: Done smoothly to avoid tissue trauma; apply gentle pressure if needed.
Document the administration: Ensures legal and clinical accountability and supports continuity of care.
Take-home points:
- Always confirm patient identity before any medication administration.
- Use correct injection angle (45–90 degrees) based on needle length and subcutaneous fat.
- Document immediately after administration to maintain accurate records and communicate care.
Why will a nurse who administers an IM medication of iron use the Z-track method of administration?
Explanation
The Z-track technique is a specialized intramuscular (IM) injection method used primarily to prevent medication from leaking into subcutaneous tissue. This method is especially important when administering irritating, staining, or viscous medications such as iron dextran. It involves displacing the skin and subcutaneous tissue laterally, injecting the medication into the muscle, and then releasing the skin to seal the medication path.
Rationale for correct answer:
4. It will prevent the drug from staining or irritating sensitive tissue.
Iron and other irritating IM medications can stain or inflame subcutaneous tissue if they backtrack from the injection site. By sealing the medication within the muscle, the Z-track technique reduces the risk of tissue discoloration, necrosis, or long-term irritation.
Rationale for incorrect answer:
1. It will provide faster absorption of the medication.
The absorption rate of a drug given intramuscularly depends on factors such as vascularity of the site and drug formulation, not on the use of the Z-track technique. This method does not accelerate absorption but prevents the medication from seeping back into subcutaneous tissue.
2. It will reduce discomfort from the needle.
The Z-track method may slightly reduce discomfort caused by irritating medications, but its main purpose is not to reduce pain from needle insertion. Discomfort depends more on needle gauge, technique, and injection site than on Z-track use.
3. It can provide more even absorption of the drug.
Absorption consistency is related to muscle perfusion and drug characteristics. The Z-track method does not directly influence how evenly the drug is absorbed, but rather prevents leakage and localized tissue damage.
Take-home points:
- Z-track technique is essential for IM administration of irritating or staining medications such as iron.
- It involves displacing the skin laterally before injection and releasing it after needle withdrawal to seal the medication in muscle.
- This method prevents leakage, reduces tissue irritation, and minimizes staining.
The nurse is finding the landmark of the acromion process and measuring down two to three fingerbreadths to administer an IM injection into which site?
Explanation
Intramuscular (IM) injections are administered directly into the muscle for faster absorption of medications. Each IM site has specific anatomical landmarks that nurses must use to prevent injury to nerves or blood vessels. The deltoid muscle is a common site for smaller volume injections (≤1 mL), such as vaccines. To locate it safely, nurses identify the acromion process and measure 2 to 3 fingerbreadths below to find the correct injection site in the thickest part of the muscle.
Rationale for correct answer:
3. Deltoid muscle
The deltoid IM site is located by palpating the acromion process and measuring 2 to 3 fingerbreadths (approximately 1–2 inches) below it. The injection is given in the thickest part of the muscle, avoiding the radial nerve and deep brachial artery.
Rationale for incorrect answer:
1. Vastus lateralis muscle
This muscle is located on the anterolateral aspect of the thigh and is often used for IM injections in infants and young children, not the upper arm. Its landmarking involves dividing the thigh into thirds, not referencing the acromion.
2. Rectus femoris muscle
This site is part of the quadriceps group and is also located on the thigh. It is used less frequently due to proximity to nerves and blood vessels. The acromion process is not involved in identifying this site.
4. Ventrogluteal site
This site is located on the lateral hip, using the greater trochanter, anterior superior iliac spine, and iliac crest as landmarks. It is ideal for larger-volume injections but is unrelated to the acromion process.
Take-home points:
- The deltoid muscle is located by finding the acromion process and measuring down 2–3 fingerbreadths.
- The deltoid site is preferred for small-volume injections like vaccines in adults.
- Always identify landmarks to avoid nerve and vascular injury during IM injections.
A student nurse reads an order to give a 69-year-old client an IM injection. Which muscles could be used for injection sites for an adult? Select all that apply.
Explanation
When administering intramuscular (IM) injections to adults, nurses must choose a site based on factors such as medication volume, client age and condition, and risk of nerve or vascular injury. The deltoid, ventrogluteal, vastus lateralis, and rectus femoris muscles are all viable options for adult clients. However, certain sites (like the dorsogluteal) are avoided due to their proximity to major nerves and blood vessels.
Rationale for correct answer:
1. Deltoid
The deltoid muscle is commonly used for intramuscular injections in adults, especially for vaccines and medications with small volumes (typically 1 mL or less). It is easily accessible and located by palpating two to three fingerbreadths below the acromion process.
3. Ventrogluteal
This site is one of the safest and most reliable locations for IM injection in adults. It is located away from major nerves and blood vessels and can accommodate larger medication volumes. It is identified using anatomical landmarks including the greater trochanter and the anterior superior iliac spine. This site is preferred for deep IM injections and oily or irritating solutions.
4. Vastus lateralis
The vastus lateralis muscle, located on the lateral thigh, is a safe and well-developed muscle for IM injections in both adults and children. It is free from major nerves and blood vessels, making it an ideal site when larger volumes of medication need to be administered or when other sites are inaccessible.
5. Rectus femoris
While not the first choice due to its proximity to nerves and increased potential for discomfort, the rectus femoris can be used in adults, especially for self-injection.
Rationale for incorrect answer:
2. Dorsogluteal
The dorsogluteal site is no longer recommended for IM injections because of its proximity to the sciatic nerve and major blood vessels, which increases the risk of nerve damage and hematoma formation.
Take-home points:
- The deltoid, ventrogluteal, vastus lateralis, and rectus femoris are all appropriate IM sites in adults.
- The dorsogluteal site is discouraged due to risk of sciatic nerve injury.
- Choose the IM site based on medication volume, client safety, and site accessibility.
The nurse needs to administer an IM injection and chooses the rectus femoris muscle. What landmarks will the nurse use for the injection?
Explanation
When administering intramuscular (IM) injections, it is essential for the nurse to identify the correct anatomical landmarks to avoid injury and ensure effective medication delivery. The rectus femoris muscle, though not the first-choice site for most IM injections due to increased sensitivity and potential for discomfort, may be used in specific cases such as self-administration or when other sites are not accessible.
Rationale for correct answer:
2. One handbreadth below the greater trochanter and one handbreadth above the knee.
This identifies the middle third of the anterior thigh, where the rectus femoris is located. The nurse palpates from the greater trochanter (hip) down and from the patella (knee) upward, selecting the middle zone for safe injection away from major vessels and nerves.
Rationale for incorrect answer:
1. Two fingerbreadths below the acromion process
This landmark is used for locating the deltoid muscle, commonly chosen for IM injections with smaller volumes like vaccines. It is not applicable for the rectus femoris.
3. Between the V of the index finger and middle finger when on the trochanter
This technique is used to locate the ventrogluteal site, a preferred IM injection site due to its safety and distance from large nerves or vessels. It is not related to the rectus femoris.
4. Between the anterior superior iliac spine and the iliac crest
This region is also associated with the ventrogluteal IM injection site and is not used when selecting the rectus femoris.
Take-home points:
- The rectus femoris site is located on the anterior thigh between the hip and the knee.
- To locate it, the nurse should measure one handbreadth below the greater trochanter and one handbreadth above the knee.
- This site is used for IM injections when other sites are not feasible, though it may cause more discomfort due to its location.
The nurse is preparing to administer an IM injection to an elderly client; what considerations need to be practiced? Select all that apply.
Explanation
Administering intramuscular (IM) injections in older adults requires special attention due to age-related physiological changes such as reduced muscle mass, skin thinning, and slower absorption rates. Nurses must assess the appropriateness of the site, needle size, and injection volume to ensure safety and effectiveness.
Rationale for correct answer:
1. Palpating the muscle to assess mass is essential before injection, particularly in elderly clients who often experience muscle atrophy. This helps the nurse determine whether the site has sufficient depth to safely receive the medication into the muscle, reducing the risk of subcutaneous injection or tissue trauma.
2. Needle length may need to be adjusted depending on the client's body composition. In older adults with reduced muscle mass or increased subcutaneous fat, a standard-length needle may not reach the muscle. Selecting an appropriate length helps ensure the drug is delivered intramuscularly for proper absorption and effect.
5. A site rotation plan is a standard practice for clients receiving repeated injections, such as those on long-term IM therapies. Rotating sites helps avoid complications like tissue fibrosis, lipohypertrophy, or scarring, and ensures consistent absorption over time.
Rationale for incorrect answer:
3. Limiting IM injection volume to 1 mL or less is not universally required for elderly adults. This guideline generally applies to the deltoid site, which can only accommodate small volumes. Larger sites, such as the ventrogluteal or vastus lateralis, can often handle up to 3 mL depending on the client’s muscle condition and tolerance.
4. Using only the deltoid muscle unnecessarily restricts the options available to the nurse. While the deltoid is convenient for smaller injections, other muscles like the ventrogluteal or vastus lateralis may be preferred due to greater muscle mass or less likelihood of nerve damage, especially in frail or cachectic clients.
Take-home points:
- Always assess muscle mass before giving an IM injection to an elderly client.
- Adjust needle length based on age-related changes in fat and muscle tissue.
- Use a site rotation schedule to protect tissue integrity and promote comfort.
A nurse is starting a peripheral IV line for the first time in an extremity of an elderly client and knows which site is the best location for an IV line?
Explanation
In elderly clients, vascular access can be challenging due to fragile veins, decreased skin elasticity, and increased risk of complications. When initiating a peripheral IV, the nurse must carefully select a site that minimizes trauma, allows secure catheter placement, and preserves future access sites.
Rationale for correct answer:
D. The metacarpal vein is often an ideal starting point if it is large enough and in good condition. Starting distally allows room to move proximally if the IV needs to be restarted. This site also minimizes restrictions in joint movement and is generally well tolerated if properly secured.
Rationale for incorrect answers:
A. The antecubital space is typically used for short procedures or emergencies because it limits arm mobility and is more prone to catheter dislodgement. For routine peripheral IV therapy, starting distally is preferred to preserve proximal sites in case of future need.
B. Using the biggest visible vein may seem practical, but this approach overlooks other critical factors such as site mobility, vein fragility, and patient comfort. In older adults, large visible veins are often fragile and more prone to rupture or infiltration.
C. The dominant hand should generally be avoided for IV placement because it may interfere with the client’s ability to perform daily activities. Use of the non-dominant hand is usually more comfortable and less restrictive.
Take-home points:
- Begin IV access distally (e.g., metacarpal veins) in older adults to preserve future venous access sites.
- Avoid the dominant hand and antecubital fossa unless clinically necessary.
- Consider vein condition, site mobility, and patient comfort when choosing an IV insertion site.
Exams on PARENTERAL ADMINISTRATION - Safe Preparation Of Parenteral Medications, Subcutaneous, Intramuscular And Intravenous Route
Custom Exams
Login to Create a Quiz
Click here to loginLessons
Notes Highlighting is available once you sign in. Login Here.
Objectives
- Understand principles of safe and sterile medication administration.
- Choose appropriate syringe type, gauge, and length for each route.
- Properly use ampules, vials, and Mix-O-Vials with aseptic technique.
- Demonstrate correct ID, SC, and IM injection methods and site selection.
- Identify IV devices, fluids, and medication delivery methods.
- Recognize and respond to IV-related complications effectively.
- Adapt parenteral practices for pediatrics, geriatrics, and emergencies.
- Follow professional, legal, and ethical standards in parenteral care.
Introduction
Parenteral administration involves delivering medications through routes that bypass the gastrointestinal tract, typically by injection.
This method allows for rapid onset of action, precise control over drug delivery, and an alternative for patients who cannot take oral medications.
The four main parenteral routes are intradermal (ID), subcutaneous (SC), intramuscular (IM), and intravenous (IV).
Each route requires detailed knowledge of anatomy, technique, and safety protocols to minimize patient risk.
2.1. Safe Administration Practices for Parenteral Medications
- Strict aseptic technique must be observed to prevent infections.
- Use the six rights of medication administration: right patient, right drug, right dose, right route, right time, and right documentation.
- Verify drug compatibility when administering multiple medications.
- Check expiration dates and integrity of packaging (e.g., cracks in ampules, cloudiness in solutions).
- Rotate injection sites to avoid tissue damage and enhance absorption.
- Label all syringes when preparing multiple medications to prevent errors.
- Always assess the patient for allergies, health status, and current medications to prevent adverse reactions.
Parenteral Administration
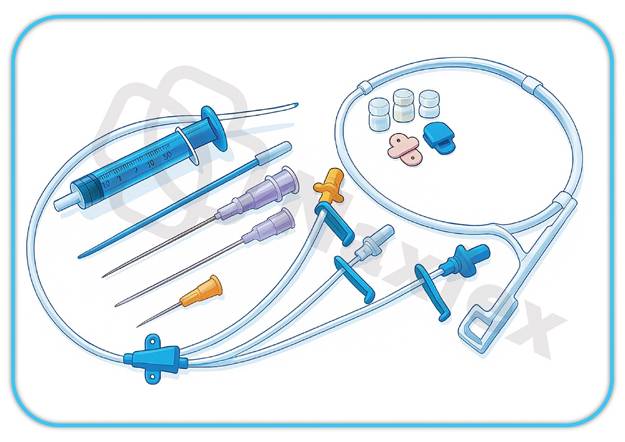
3.1. Syringe and needle selection
Syringe Types and Volumes
- Tuberculin Syringes: 1 mL max, 0.01 mL graduations, for precise small doses
- Larger-Volume Syringes: 3-60 mL, 0.1-1 mL graduations, for higher volumes
- Selection Guideline: 0.1-1 mL = tuberculin, >1 mL = appropriate larger syringe
Needle Gauge and Length
- Gauge System: Higher numbers = smaller diameter (25-27G for SC, 21-22G for IM)
- Length Selection: SC = ¼-⅝ inch, IM = 1-1½ inches, adjusted for age/body habitus
- Special Considerations: Elderly (decreased tissue), pediatric (shorter), obese (longer needles)
Prefilled Syringes
- Advantages: Reduced errors, time savings, sterility maintenance
- Disadvantages: Higher cost, limited flexibility, fixed dosages
- Verification: Drug, expiration, integrity, dose appropriateness
3.2. Medication containers
Ampules
- Sealed glass with breakable necks
- Single-dose only
- Requires filter needle for withdrawal
- Opening technique: Clean neck, wrap with gauze, break away from body
Vials
- Single-Dose: One-time use, no preservatives
- Multi-Dose: Preservatives present, requires dating after first entry
- Access: Disinfect stopper, use appropriate needle, maintain sterility
Mix-O-Vials
- Dual-chamber design for reconstitution
- Press plunger to mix powder and diluent
- Single-use system maintaining sterility
- Common for antibiotics and biologics
3.3. Drug mixing and injection techniques
Insulin Mixing Protocol
- Draw air equal to clear insulin dose
- Withdraw clear insulin first
- Draw air equal to cloudy insulin dose
- Withdraw cloudy insulin
- Gently roll (don't shake) to mix
- Verify total volume matches order
Intradermal Injection
- Indications: PPD testing, allergy testing
- Site: Inner forearm
- Equipment: ¼-½ inch, 26-27G needle, tuberculin syringe
- Technique: 10-15° angle, form visible wheal (0.1 mL)
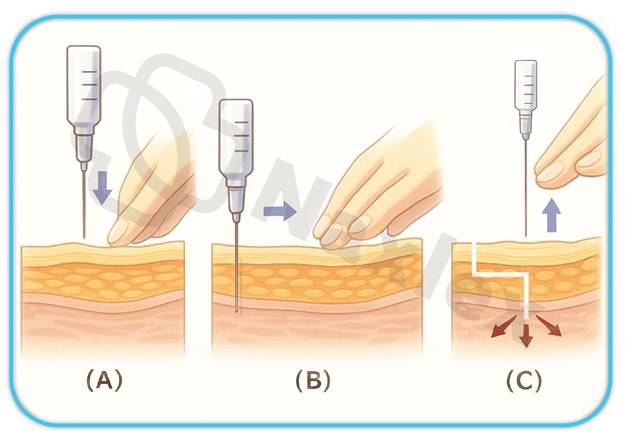
3.4. SUBCUTANEOUS INJECTION
Clinical Applications
- Insulin therapy, heparin, vaccines, hormones
- Sites: Abdomen (2 inches from umbilicus), upper arms, thighs, upper back
- Site Rotation: Minimum 1-inch between sites, document locations
Technique
- Pinch subcutaneous tissue
- 45-90° angle depending on patient factors
- Aspirate per policy
- Inject slowly, withdraw quickly
- Apply gentle pressure if needed
Special Populations
- Pediatric: Smaller needles (¼-½ inch), distraction techniques
- Geriatric: Decreased tissue, potential bleeding risk
- Obese: Longer needles (⅝-1 inch), 90° angle recommended
3.5. INTRAMUSCULAR INJECTION
SITES
Vastus Lateralis
- Middle third of anterior thigh
- Safe for all ages, large muscle mass
- Landmarks: Greater trochanter to knee
Ventrogluteal (Preferred)
- Hip area, gold standard for adults
- Landmark: Hand over greater trochanter, index finger to ASIS, middle finger to iliac crest
- Injection site center of V formed by fingers
Deltoid
- Upper arm, 1-2 inches below acromion
- Limited to 2 mL volumes
- Avoid area below axilla (radial nerve risk)
Rectus Femoris
- Middle third of anterior thigh
- Less preferred due to nerve proximity
TECHNIQUES
Standard Technique
- 90° angle insertion
- Inject medication slowly
- Withdraw needle quickly
- Apply pressure if needed
Z-Track Method
- For irritating/staining medications
- Displace tissue laterally before injection
- Prevents leakage into subcutaneous tissue
- Release tissue after injection
Age-Specific Site Selection
- Infants: Vastus lateralis only
- Children: Vastus lateralis, ventrogluteal (cooperative)
- Adults: Ventrogluteal preferred, deltoid acceptable
- Older Adults: Ventrogluteal, consider decreased muscle mass
Complications
- Immediate: Pain, bleeding, nerve injury
- Delayed: Abscess, fibrosis, tissue necrosis
Intravenous Administration
5.1. Iv access devices
Peripheral IV Catheters
- Gauges: 14G (emergency) to 24G (pediatric/fragile)
- Insertion: 15-30° angle, advance catheter over needle
- Maintenance: Every 4-8 hours assessment, patency verification
Central Venous Catheters (CVCs)
- Indications: Long-term therapy, irritating medications, TPN
- Types: Non-tunneled, tunneled, implanted ports, PICCs
- Sites: Internal jugular, subclavian, femoral
Advanced Access
- Midline Catheters: 8-12 inches, up to 4 weeks use
- Implanted Ports: Internal system, monthly access required
- PICCs: Mid-arm insertion, long-term peripheral access
5.2. Iv fluids and solutions
Isotonic Solutions (~290 mOsm/L)
- Examples: 0.9% NS, Lactated Ringer's, D5W in NS
- Uses: Dehydration, maintenance, surgical procedures
- Effect: Expands extracellular volume without cell shift
Hypotonic Solutions (<290 mOsm/L)
- Examples: 0.45% NS, 0.33% NS, D5W
- Uses: Hypernatremia, cellular dehydration
- Caution: Risk of cerebral edema
Hypertonic Solutions (>290 mOsm/L)
- Examples: 3% NS, D50W, D10W, 5% Albumin
- Uses: Severe hyponatremia, hypoglycemia, volume depletion
- Effect: Draws fluid from cells to extracellular space
5.3. Iv medication administration
General Principles
- Verify patency before administration
- Flush with NS before and after
- Monitor vital signs and patient response
- Check drug compatibility with IV solutions
Administration Methods
- IV Push: 1-5 minutes unless specified, dilute as ordered
- Gravity Infusion: Manual drip rate adjustment
- Infusion Pumps: Precise rate control with safety features
- Saline Lock: Flush before/after medications every 8-12 hours
- Secondary Piggyback: Connects to primary line via Y-port
Safety Measures
- Continuous patient monitoring during administration
- Have resuscitation equipment available
- Document time, dose, and patient response
- Stop infusion immediately for adverse reactions
5.4. IV Assessment and Maintenance
Baseline Assessments
- Patient: Vital signs, fluid balance, lab values
- Site: Inspection (redness, swelling), palpation (tenderness), function (patency)
Ongoing Monitoring
- Peripheral IVs: Every 4-8 hours
- Central lines: Every 8-24 hours
- During rapid infusions: Continuous monitoring
- Medication administration: Special attention to compatibility
Patency Maintenance
- Normal Saline: Routine flushing
- Heparin Flush: Intermittent use lines
- Technique: Positive pressure flushing to prevent reflux
- Frequency: Before/after medications, every 8-12 hours
Infection Prevention
- Hand hygiene before all procedures
- Sterile technique for insertion/dressing changes
- Prompt attention to infection signs
- Immediate reporting of complications
5.5. IV administration Complications
Common:
Phlebitis/Thrombophlebitis
- Grades: 1 (redness) to 4 (purulent drainage)
- Management: Discontinue IV, warm compresses, elevation
- Prevention: Proper site selection, regular assessment
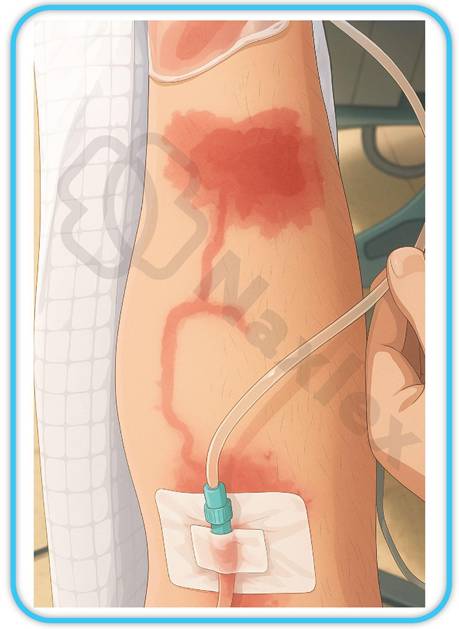
Infiltration/Extravasation
- Infiltration: Non-vesicant fluid leakage
- Extravasation: Vesicant medication leakage
- Signs: Swelling, coolness, decreased flow
- Intervention: Stop infusion, remove catheter, elevate extremity
Localized Infection
- Signs: Redness, warmth, purulent drainage
- Treatment: Remove catheter, culture, antibiotics
- Monitoring: Resolution of infection signs
Septicemia
- Emergency Signs: Fever, chills, hypotension, altered mental status
- Immediate Actions: Blood cultures, broad-spectrum antibiotics
- Supportive Care: Fluids, vasopressors, close monitoring
Life-Threatening:
Air Embolism
- Cause: Air entry through open line
- Signs: Dyspnea, chest pain, decreased LOC
- Management: Left lateral decubitus, Trendelenburg position, clamp line

Pulmonary Edema
- Cause: Fluid overload, rapid infusion
- Signs: Dyspnea, crackles, frothy sputum
- Treatment: Stop infusion, upright position, oxygen, diuretics
Catheter Embolism
- Cause: Catheter fragment entering circulation
- Signs: Sudden dyspnea, chest pain
- Management: Immobilize extremity, chest X-ray, specialist consultation
Speed Shock
- Cause: Rapid IV medication administration
- Signs: Flushed face, headache, syncope
- Prevention: Slow administration as ordered
- Treatment: Stop infusion, supportive care
Special Considerations
Populations
Pediatric Considerations
- Developmental: Smaller veins, higher metabolism
- Technical: Smaller gauge equipment, lower volumes
- Safety: Double-check calculations, involve parents
- Pain Management: Distraction techniques, comfort measures
Geriatric Considerations
- Physiological: Decreased cardiac output, renal function
- Clinical: Drug interaction monitoring, dose adjustments
- Assessment: Signs of fluid overload, cognitive factors
Pregnancy/Lactation
- Drug Transfer: Placental transfer, breast milk excretion
- Nursing Actions: Verify pregnancy status, review safety categories
- Monitoring: Maternal/fetal well-being assessment
Emergency Administration
Cardiac Arrest Medications
- Epinephrine: 1 mg IV/IO every 3-5 minutes
- Amiodarone: 300 mg IV push, then 150 mg
- Atropine: 1 mg IV push for bradycardia
Rapid Sequence Intubation
- Etomidate: 0.3 mg/kg IV push
- Succinylcholine: 1-1.5 mg/kg IV push
- Rocuronium: 0.6-1.2 mg/kg IV push
Anaphylaxis Management
- Epinephrine: 0.3-0.5 mg IM lateral thigh
- Antihistamines: Diphenhydramine 25-50 mg IV/IM
- Corticosteroids: Methylprednisolone 125 mg IV
Stroke Protocol
- tPA Administration: Within 3-4.5 hours of symptom onset
- Strict timing and neurological monitoring required
Technology Integration
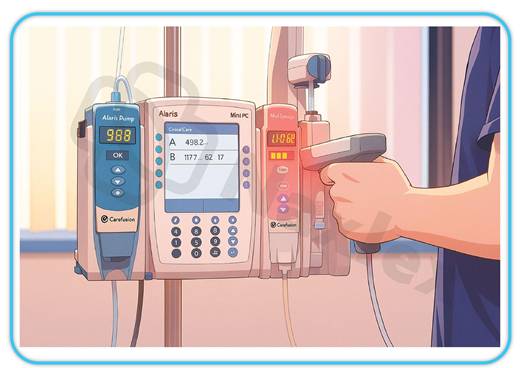
Smart Infusion Pumps
- Features: Drug libraries, clinical decision support, barcode scanning
- Benefits: Error reduction, dose limit alerts, audit trails
- Challenges: Staff training, system integration, maintenance
Electronic Health Records
- Integration: Real-time documentation, clinical decision support
- Benefits: Data analytics, trend analysis, compliance monitoring
- Quality Improvement: Safety event identification, outcome measurement
Mobile Technology
- Point-of-Care: Mobile MAR, barcode scanning, clinical references
- Patient Engagement: Educational resources, self-tracking tools
- Communication: Interdisciplinary team platforms
Quality Assurance and Safety
Medication Error Prevention
- System Approaches: Standardization, redundancy, technology integration
- High-Alert Medications: Special handling, double-check procedures
- Education: Ongoing competency development, safety training
Root Cause Analysis
- Process: Immediate response, data collection, analysis, action planning
- Common Factors: Communication breakdowns, staffing issues, equipment failures
- Corrective Actions: Protocol implementation, staff education, system improvements
Performance Improvement
- Quality Metrics: Error rates, patient satisfaction, infection rates, compliance
- Continuous Improvement: Policy review, best practice implementation
- Outcome Measurement: Trend analysis, effectiveness evaluation
Legal and Ethical Considerations
Professional Standards
- Scope of Practice: State nurse practice acts, institutional policies
- Legal Responsibilities: Standard of care, documentation, informed consent
- Confidentiality: HIPAA compliance, privacy protection
Ethical Principles
- Autonomy: Patient decision-making, informed consent, cultural sensitivity
- Beneficence/Non-maleficence: Risk-benefit balance, error prevention, advocacy
- Justice: Equitable care delivery, resource allocation
Risk Management
- Liability: Professional insurance, incident reporting, expert testimony
- Documentation Standards: Timely, accurate, objective, legally admissible
- Regulatory Compliance: Accreditation standards, quality requirements
Nursing Insight
Safety First Principles
- Always verify patient identity and medication orders
- Maintain sterile technique for all parenteral procedures
- Monitor patients continuously during and after administration
- Document every action and observation thoroughly
- Report any concerns or adverse events immediately
Technical Competency
- Master various injection techniques and routes
- Understand equipment selection and application
- Know medication properties and compatibilities
- Develop troubleshooting skills for common issues
Evidence-Based Practice
- Stay current with literature and guidelines
- Participate in quality improvement initiatives
- Integrate research findings into clinical practice
- Mentor colleagues and students in best practices
Summary
Emerging Technologies
- Advanced smart pump capabilities with AI integration
- Telehealth and remote monitoring applications
- Personalized medicine and pharmacogenomics
- Sustainable practice and environmental considerations
Practice Evolution
- Increased focus on patient-centered care
- Enhanced interdisciplinary collaboration
- Global health and safety standards adoption
- Technology-driven efficiency improvements
Final Clinical Pearls
- Never assume: Always verify patient identity and medication orders
- Think critically: Consider patient factors, drug properties, and interactions
- Communicate effectively: With patients, families, and healthcare team
- Document thoroughly: Every detail contributes to patient safety
- Learn continuously: Medicine evolves rapidly; stay current
- Advocate actively: For patient safety, quality care, and optimal outcomes
For Clinical Practice
- Safety is paramount in all parenteral administration
- Technical skills must be combined with critical thinking
- Continuous education ensures competency maintenance
- Professional advocacy improves patient outcomes
- Quality improvement drives practice excellence
Naxlex
Videos
Login to View Video
Click here to loginTake Notes on PARENTERAL ADMINISTRATION - Safe Preparation Of Parenteral Medications, Subcutaneous, Intramuscular And Intravenous Route
This filled cannot be empty
Join Naxlex Nursing for nursing questions & guides! Sign Up Now
